The Health & Safety area is where the HSE app user can manage, and report incidents, injuries, and hazards; plus record and manage a hazardous chemical register
Dashboards
The dashboards provide aggregated information about existing active incidents, injuries, hazards, and activities using lists and graphics.
- Clicking on the Dashboards option in the Sitemap will display your default dashboard.
- Click on the dashboard name or dropdown arrow to switch between dashboard options.

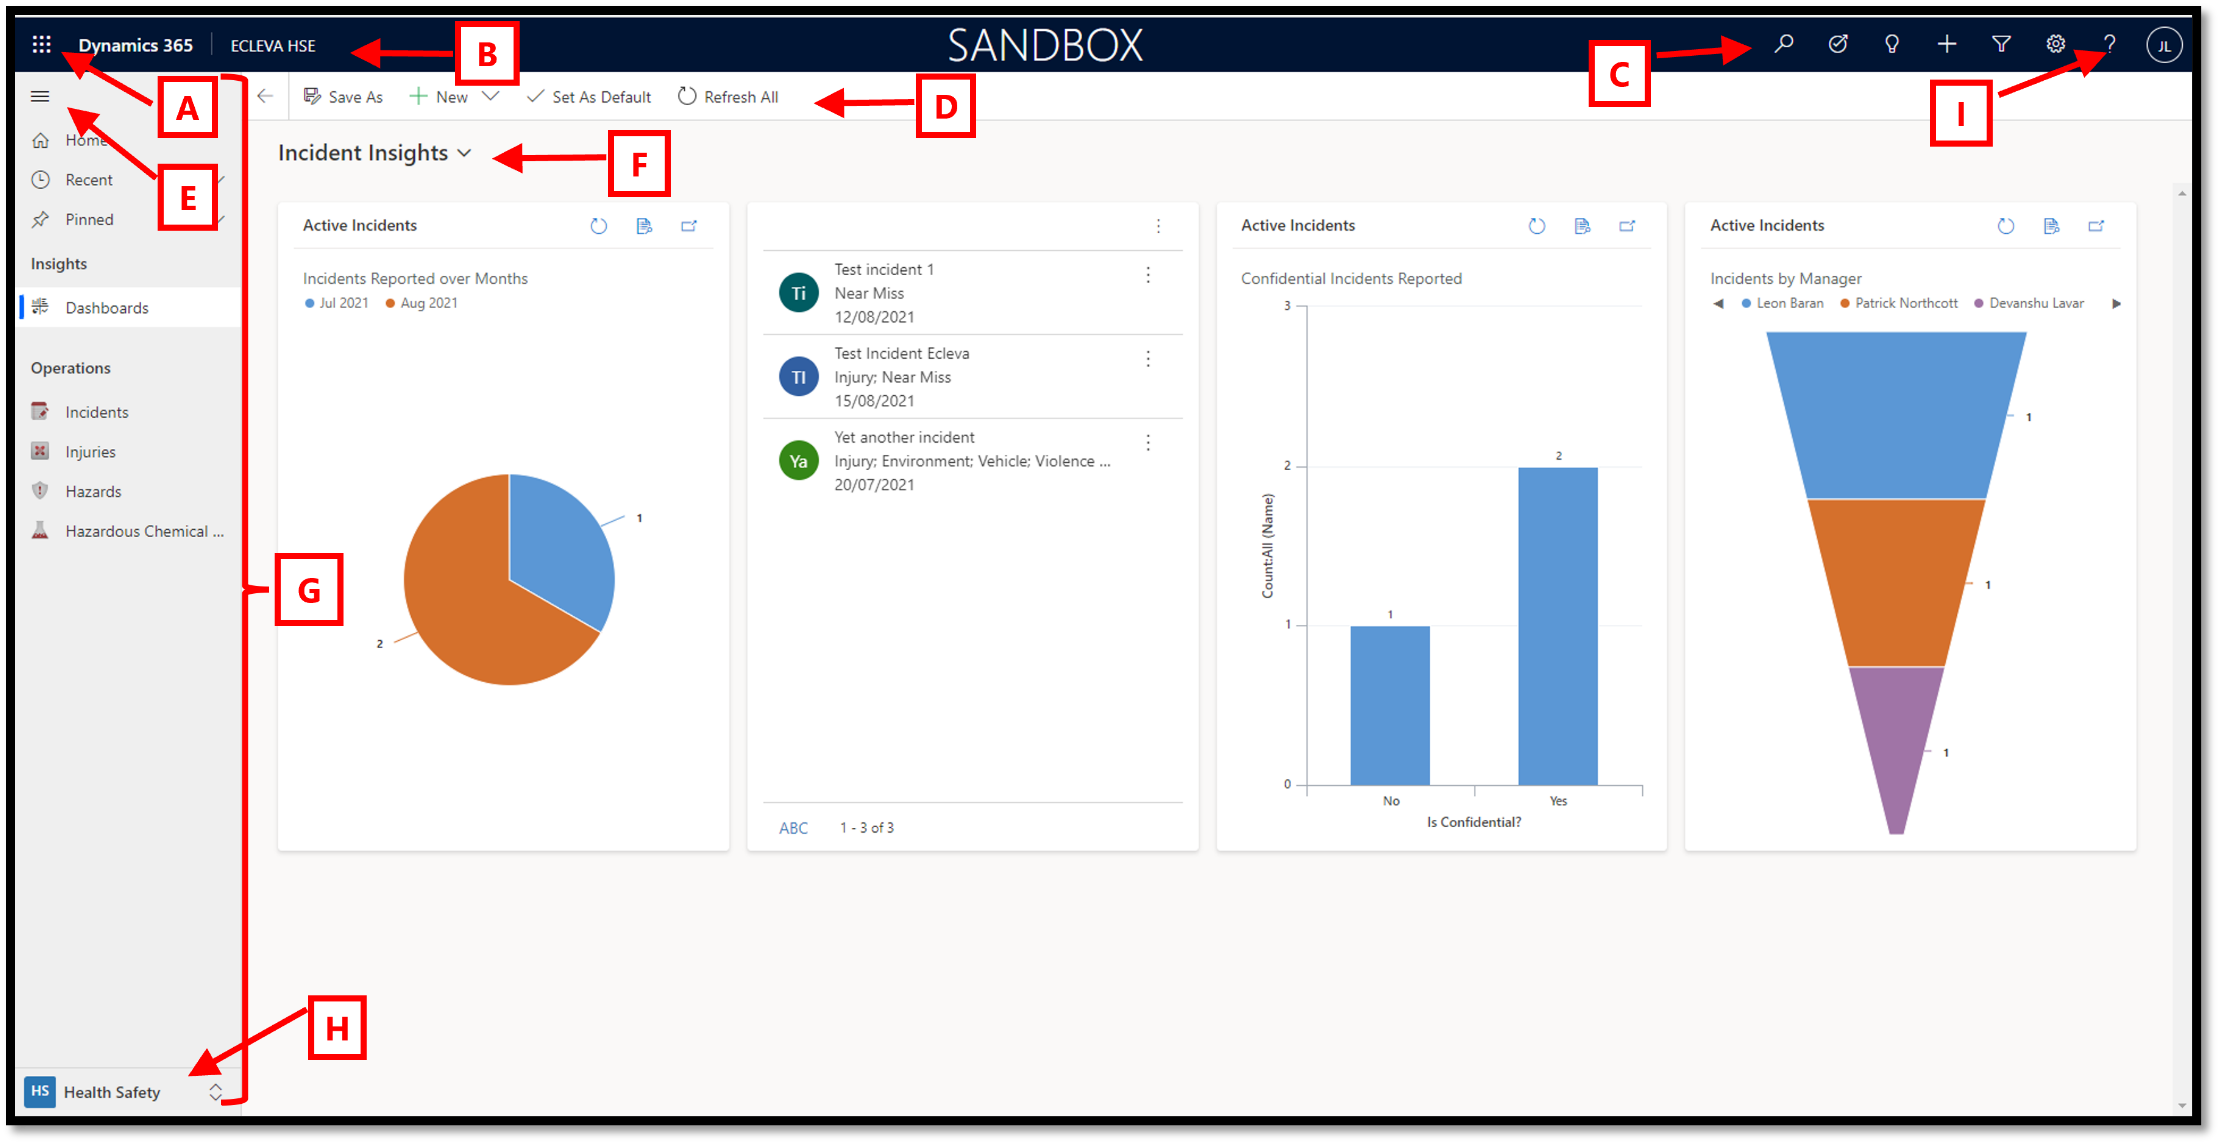
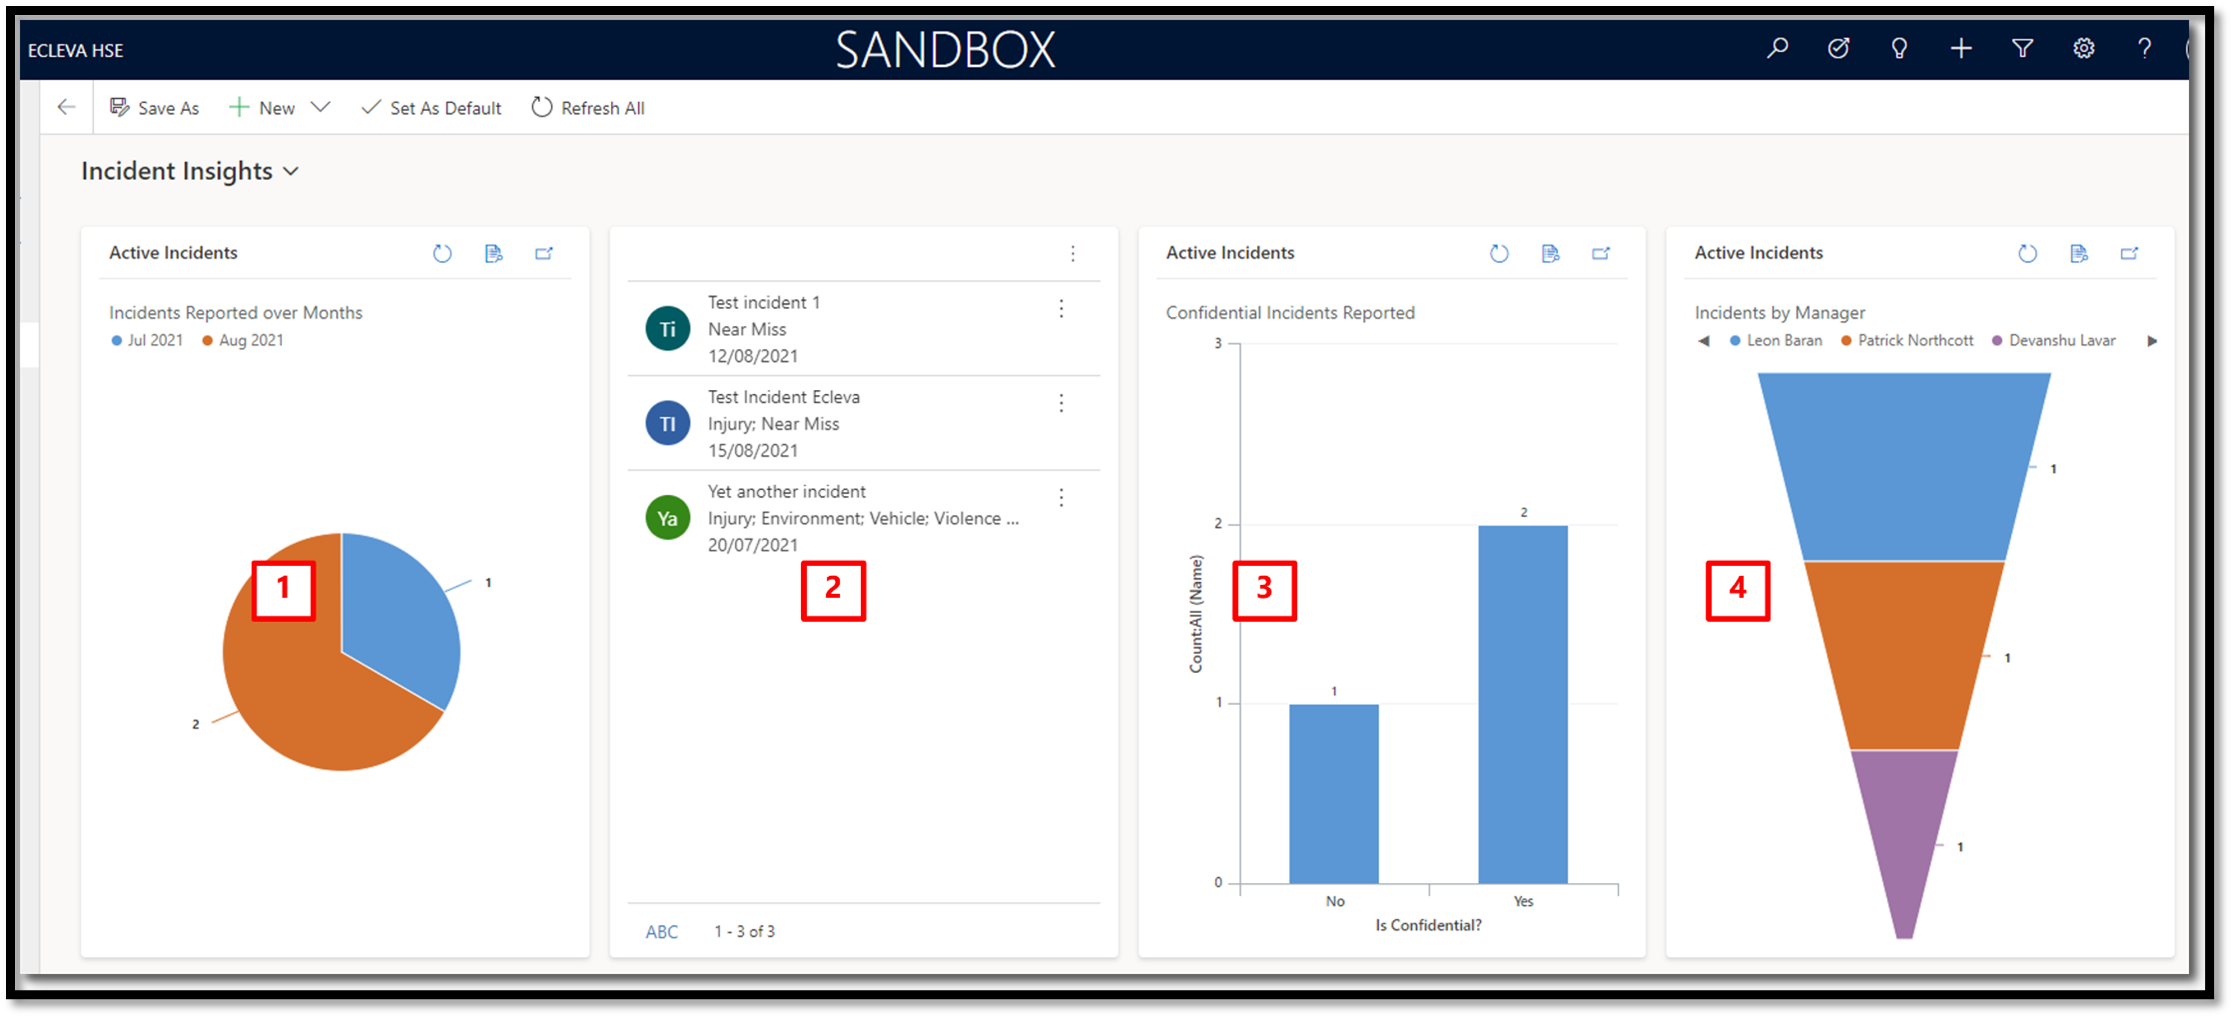
The Incident Insights dashboard
Below is an example of the Incident Insights dashboard.
- Incident Reported Over Months
This is a graphical summary of all active incidents reported over months for your organization.
- Active Incident List
This is a list of all active incidents for your organization, and you can open an incident by clicking on it.
- Confidential Incidents Reported
You can see a summary of all active confidential incidents within your organization.
- Incidents By Manager
You can see a summary of all active incidents by manager in your organization.
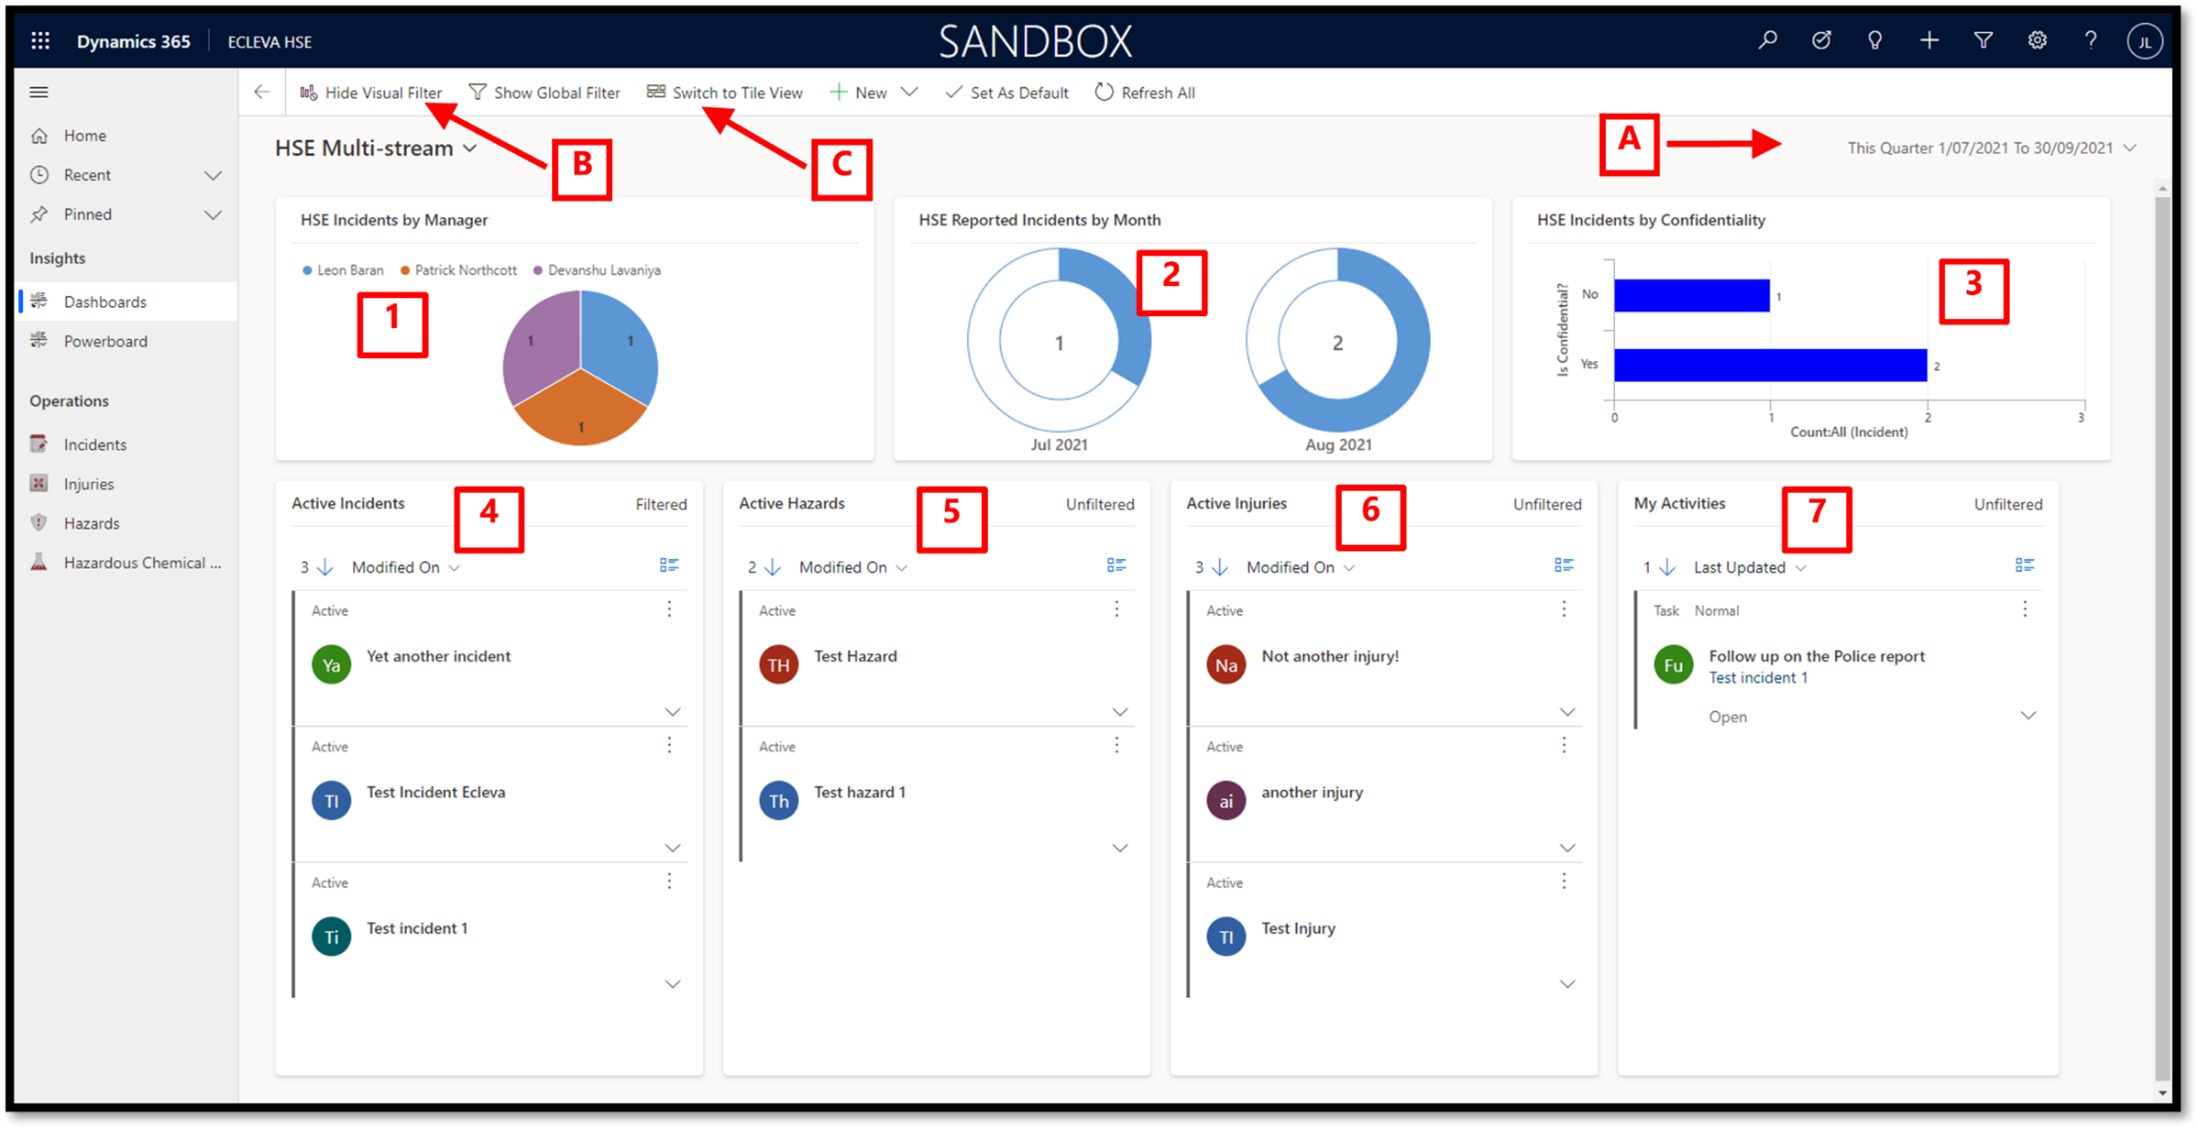
The HSE Incidents summary dashboard
- Period selector
- Visual Filter toggle
- Tile View toggle
Below is an example of the HSE Incidents summary dashboard.
Charts
Clicking on the down arrow within a listed item will display more information about that item.
- HSE Incidents by Manager
This is a graphical summary of all active incidents by manager, filtered by the selected period.
- HSE Reported Incidents by Month
This is a graphical summary of all reported incidents by month, filtered by the selected period.
- HSE Incidents by Confidentiality
This is a graphical summary of all active incidents by confidentiality, filtered by the selected period.
Lists
Clicking on the down arrow within a listed item will display more information about that item.
- Active Incidents
This is a list of all active incidents, filtered by the selected period, sorted by last modified date in descending order.
- Active Hazards
This is a list of active hazard records, sorted by last modified date in descending order.
- Active Injuries
This is a list of active injury records, sorted by last modified date in descending order.
- My Activities
This is a list of your active activities, sorted by last updated date in descending order.
Notes
• The visual filters are hidden by default, you need to toggle them on before thy become visible. |
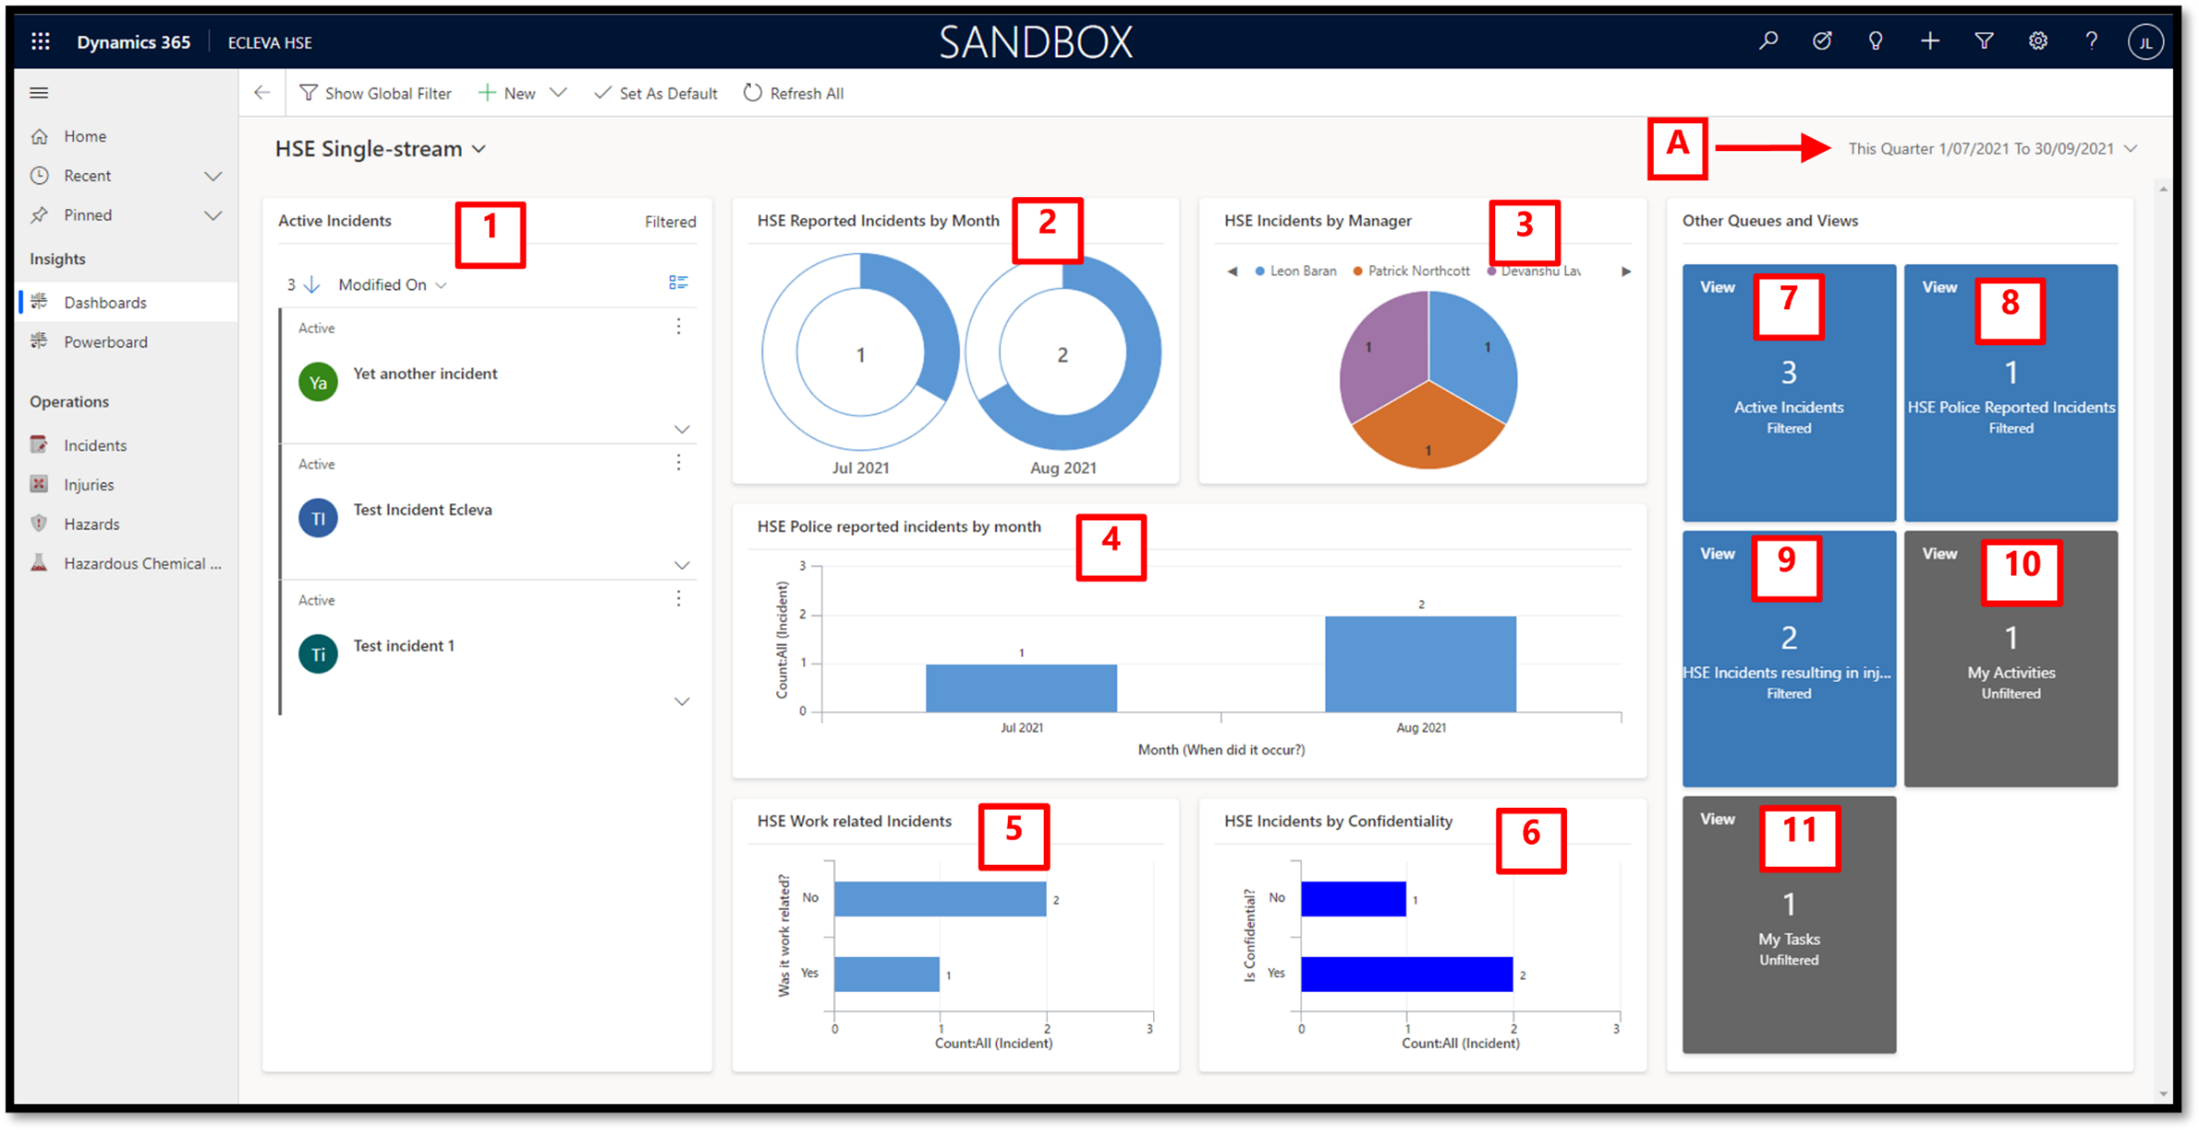
The HSE Incidents, Injury, & Hazards summary dashboard
- Period selector
Below is an example of the HSE Incidents, Injury, & Hazards summary dashboard.
Lists
Clicking on the down arrow within a listed item will display more information about that item.
- Active Incidents list
This is a list of all active incidents, filtered by the selected period, sorted by last modified date in descending order.
Charts
Clicking a chart element will further filter the dashboard display.
- HSE Reported Incidents by Month
This is a graphical summary of all reported incidents by month, filtered by the selected period.
- HSE Incidents by Manager
This is a graphical summary of all active incidents by manager, filtered by the selected period.
- HSE Police reported incidents by month
This is a graphical summary of all active incidents that have been reported to police, filtered by the selected period.
- HSE Work related incidents
This is a graphical summary of all active work related incidents, filtered by the selected period.
- HSE Incidents by Confidentiality
This is a graphical summary of all active incidents by confidentiality, filtered by the selected period.
Tiles
Clicking on the View option within a tile will display a popup list of records.
Clicking on an item in the popup list will open that record.
- Active Incidents Filtered tile
This is a summary tile, displaying the number of active incidents, filtered by the selected period.
- HSE Police reported incidents Filtered tile
This is a summary tile, displaying the number of active incidents that have been reported to police, filtered by the selected period.
- HSE Incidents resulting in injury Filtered tile
This is a summary tile, displaying the number of active incidents where one or more injuries have been sustained, filtered by the selected period.
- My Activities tile
This is a summary tile, displaying the number of activities that have been created by or assigned to you.
- My Tasks tile
This is a summary tile, displaying the number of tasks that have been created by or assigned to you.
Incidents
The Incident table type is where you can manage your incident rows by viewing, updating, deleting and creating new rows (records).
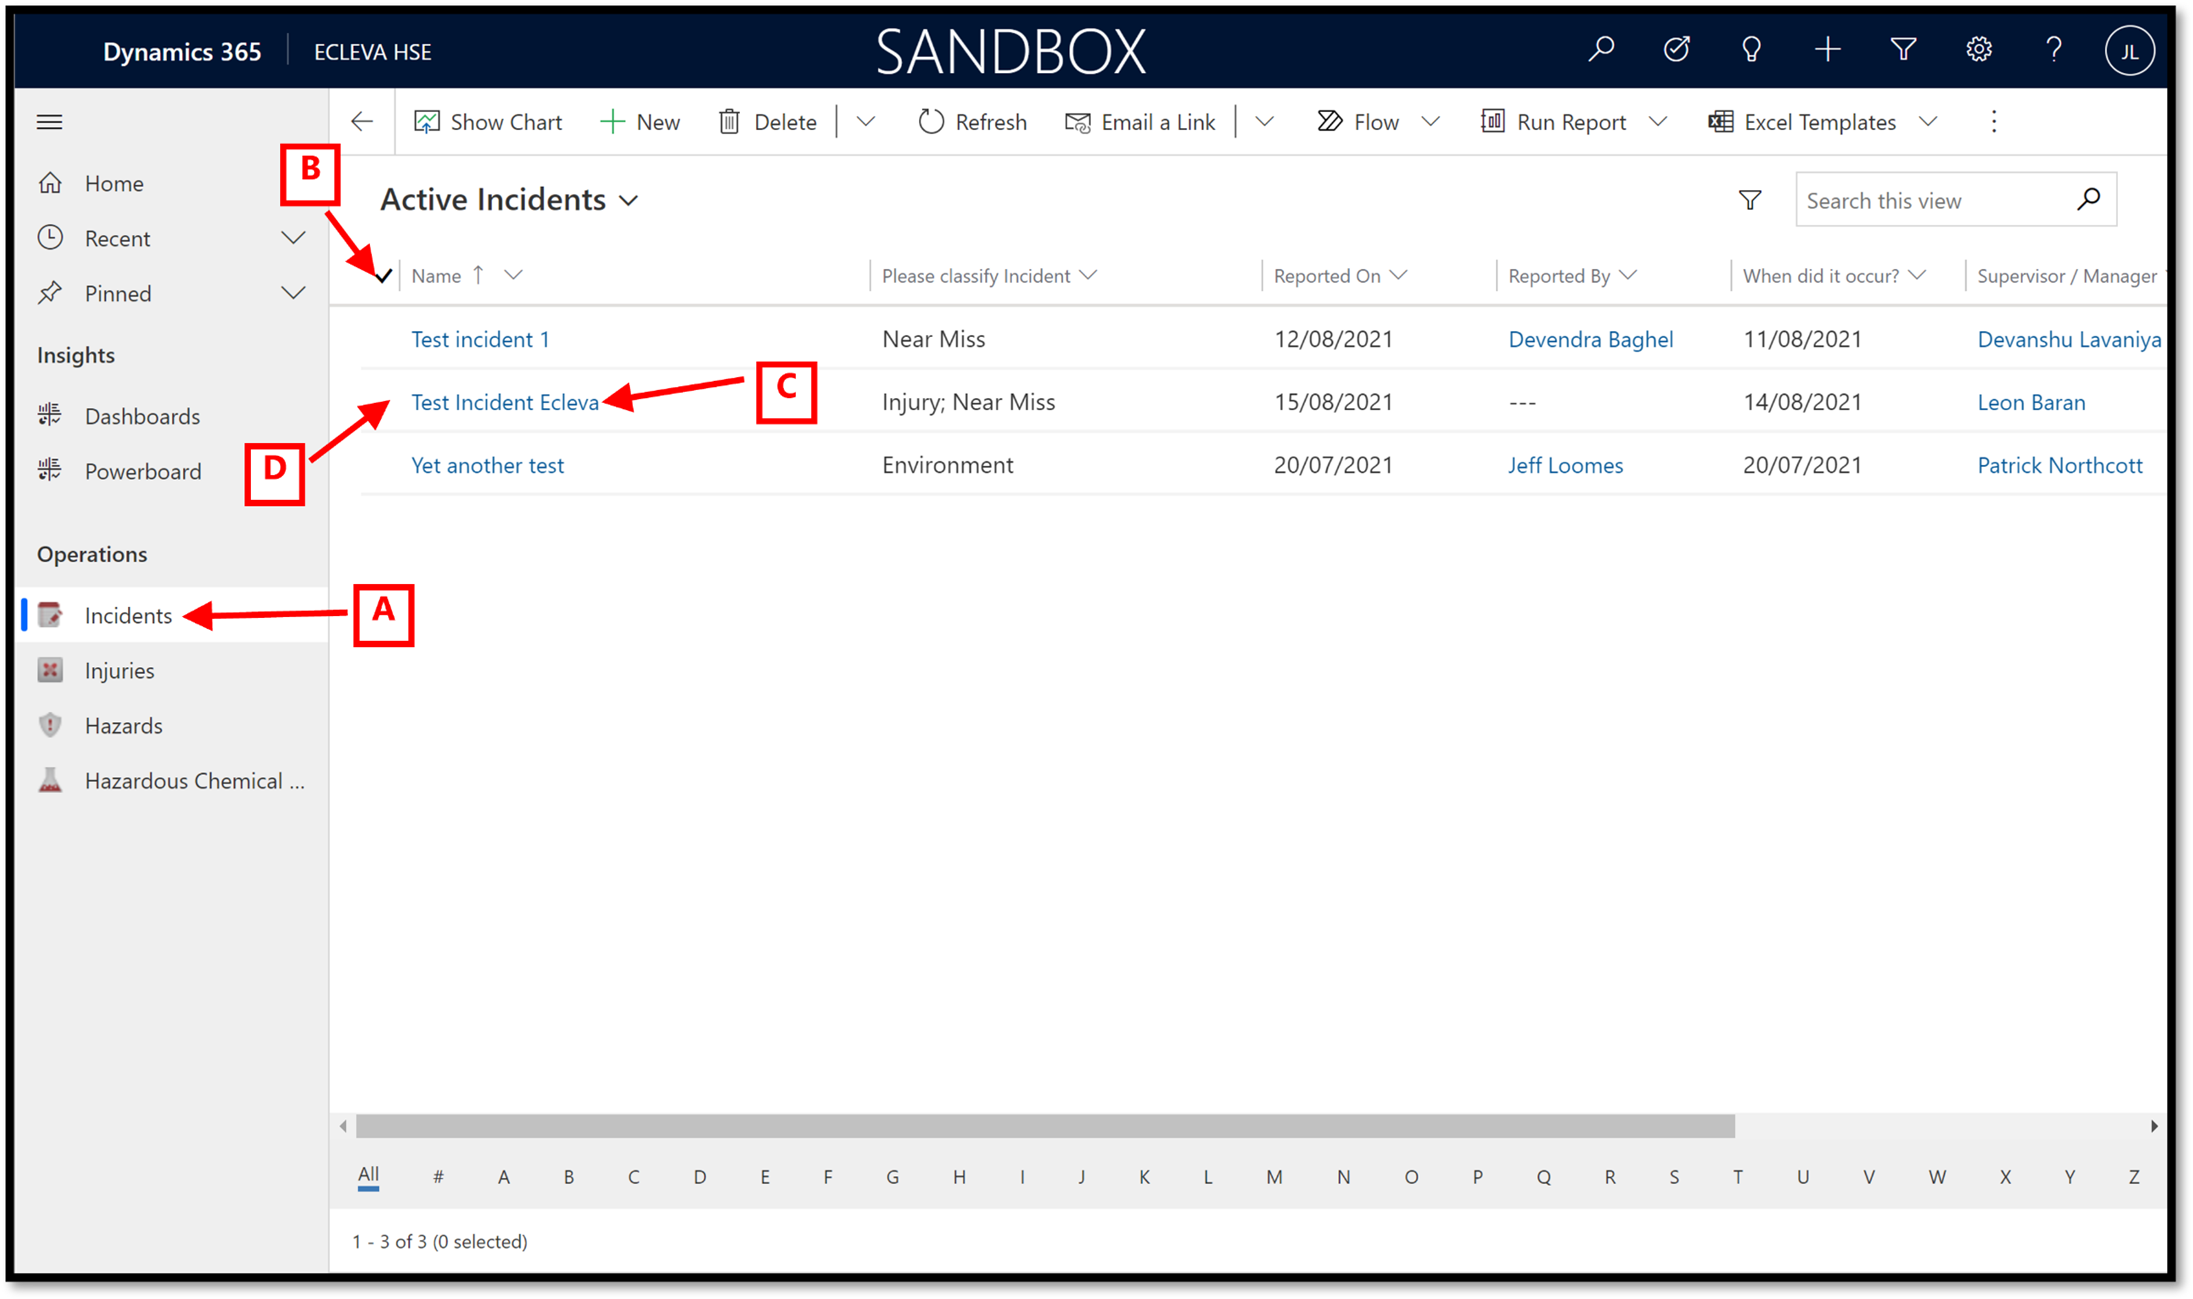
The Active Incident view
The Active Incident view displays all existing incident rows.
| Note
• You may have to use paging, backward or forward, to see all existing incidents. |
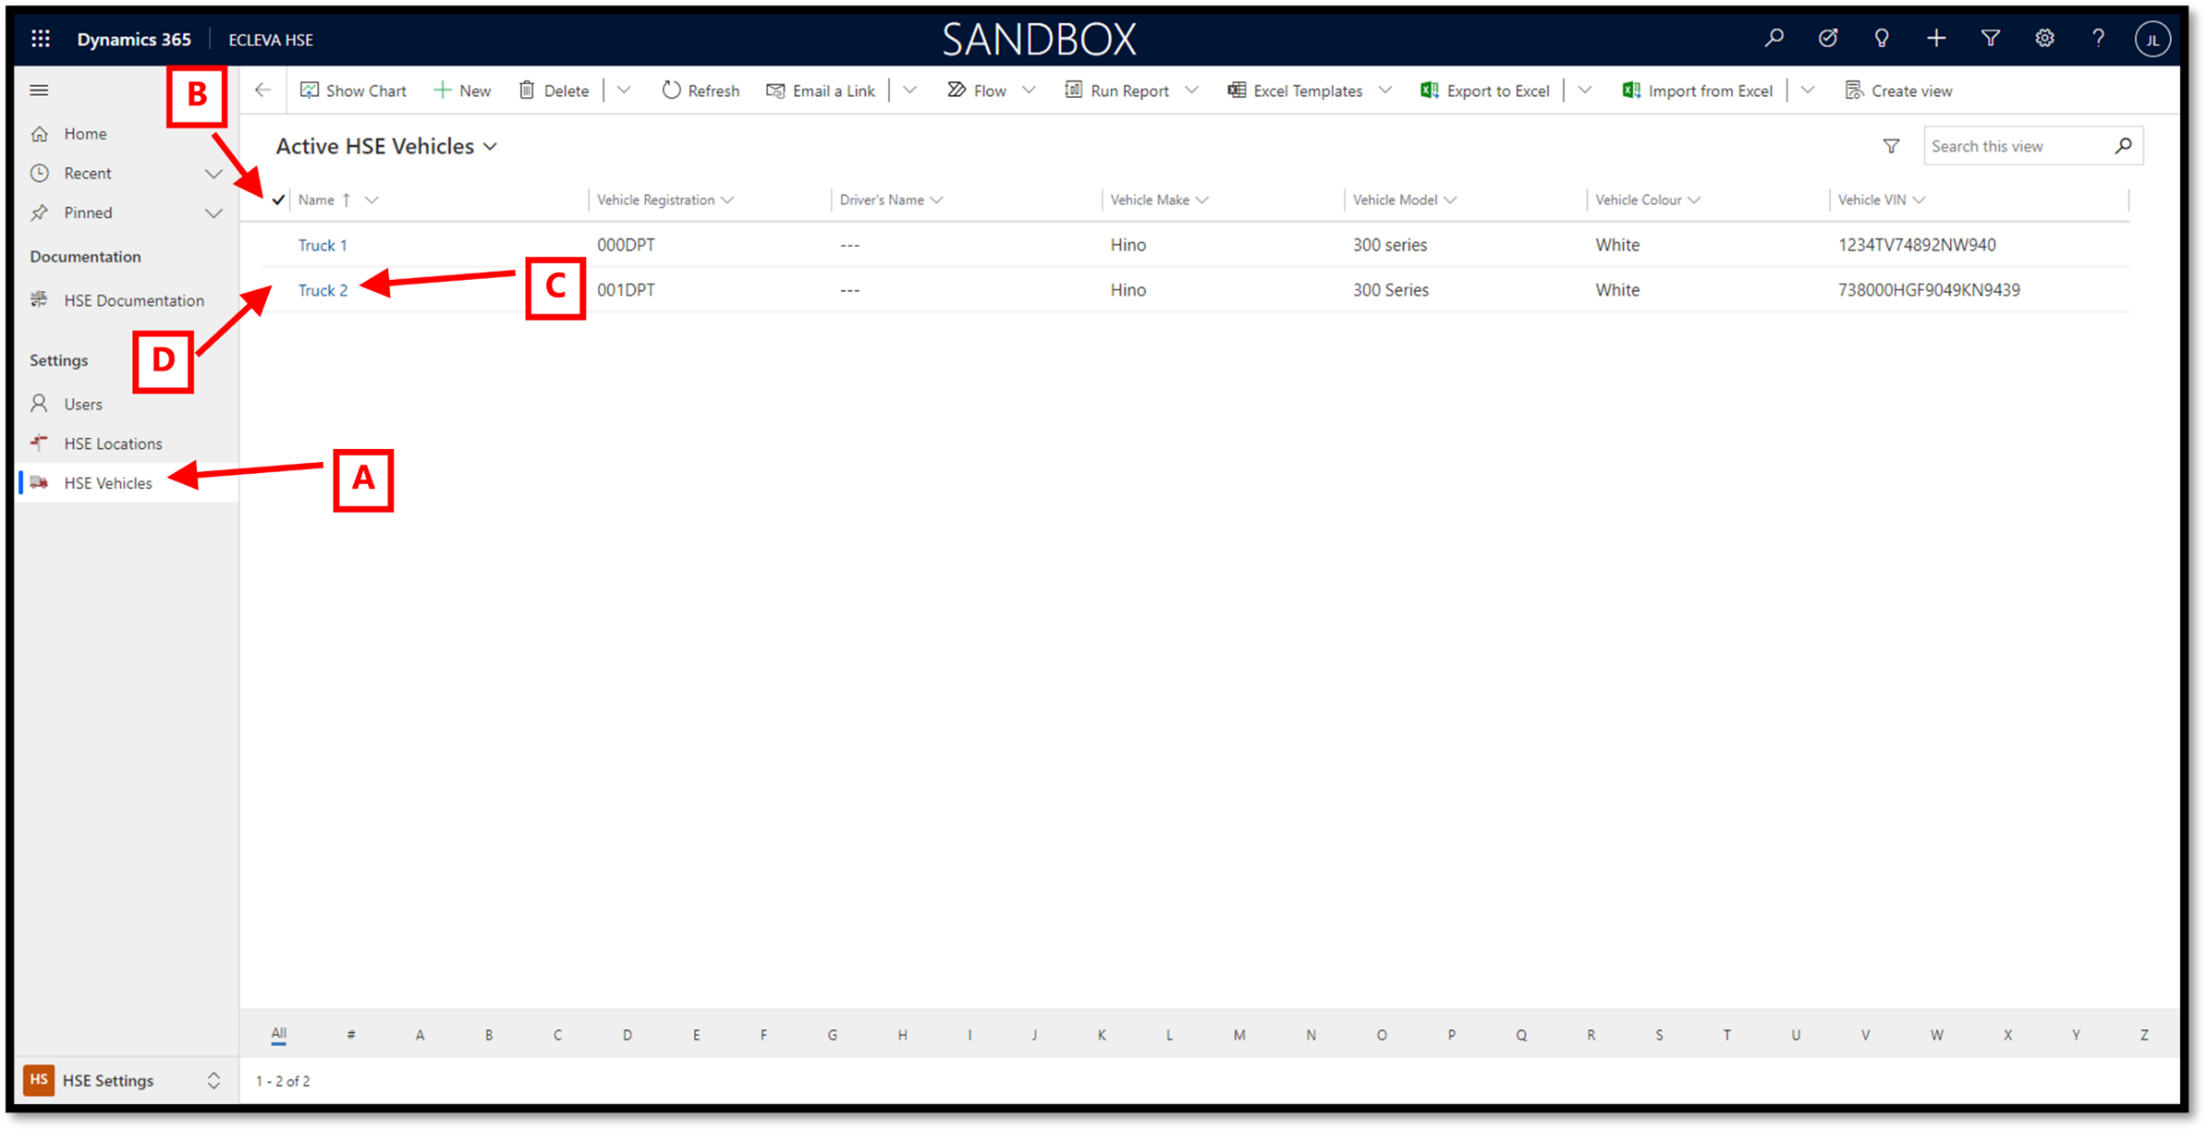
- Click on the Incidents option in the Sitemap to view existing rows.
- Click on the Tick icon to select all rows in the currently view.
Click on the Tick icon again to deselect all rows displayed.
- Click on the incident Name to directly open that record.
- Select a single row in the current view by: –
Clicking to the left of the name column, on any given row, to select that row.
or
Click in the white space on any given row, to select that row.
Select multiple rows by by holding down either the Shift or Ctrl button and selecting a row.
| Note
• Selecting one or more rows will change the available command bar buttons.
• Your assigned permissions also control the visible command bar buttons. |
Creating a new Incident from an incident view
- You can add new incidents by clicking on the +New button in the command bar… this action will open a blank Incident form.

Creating a new Incident from an open incident
- You can also add a new incident by clicking on the +New button in the command bar… this action will check the open incident for any unsaved changes, before opening a blank incident form.

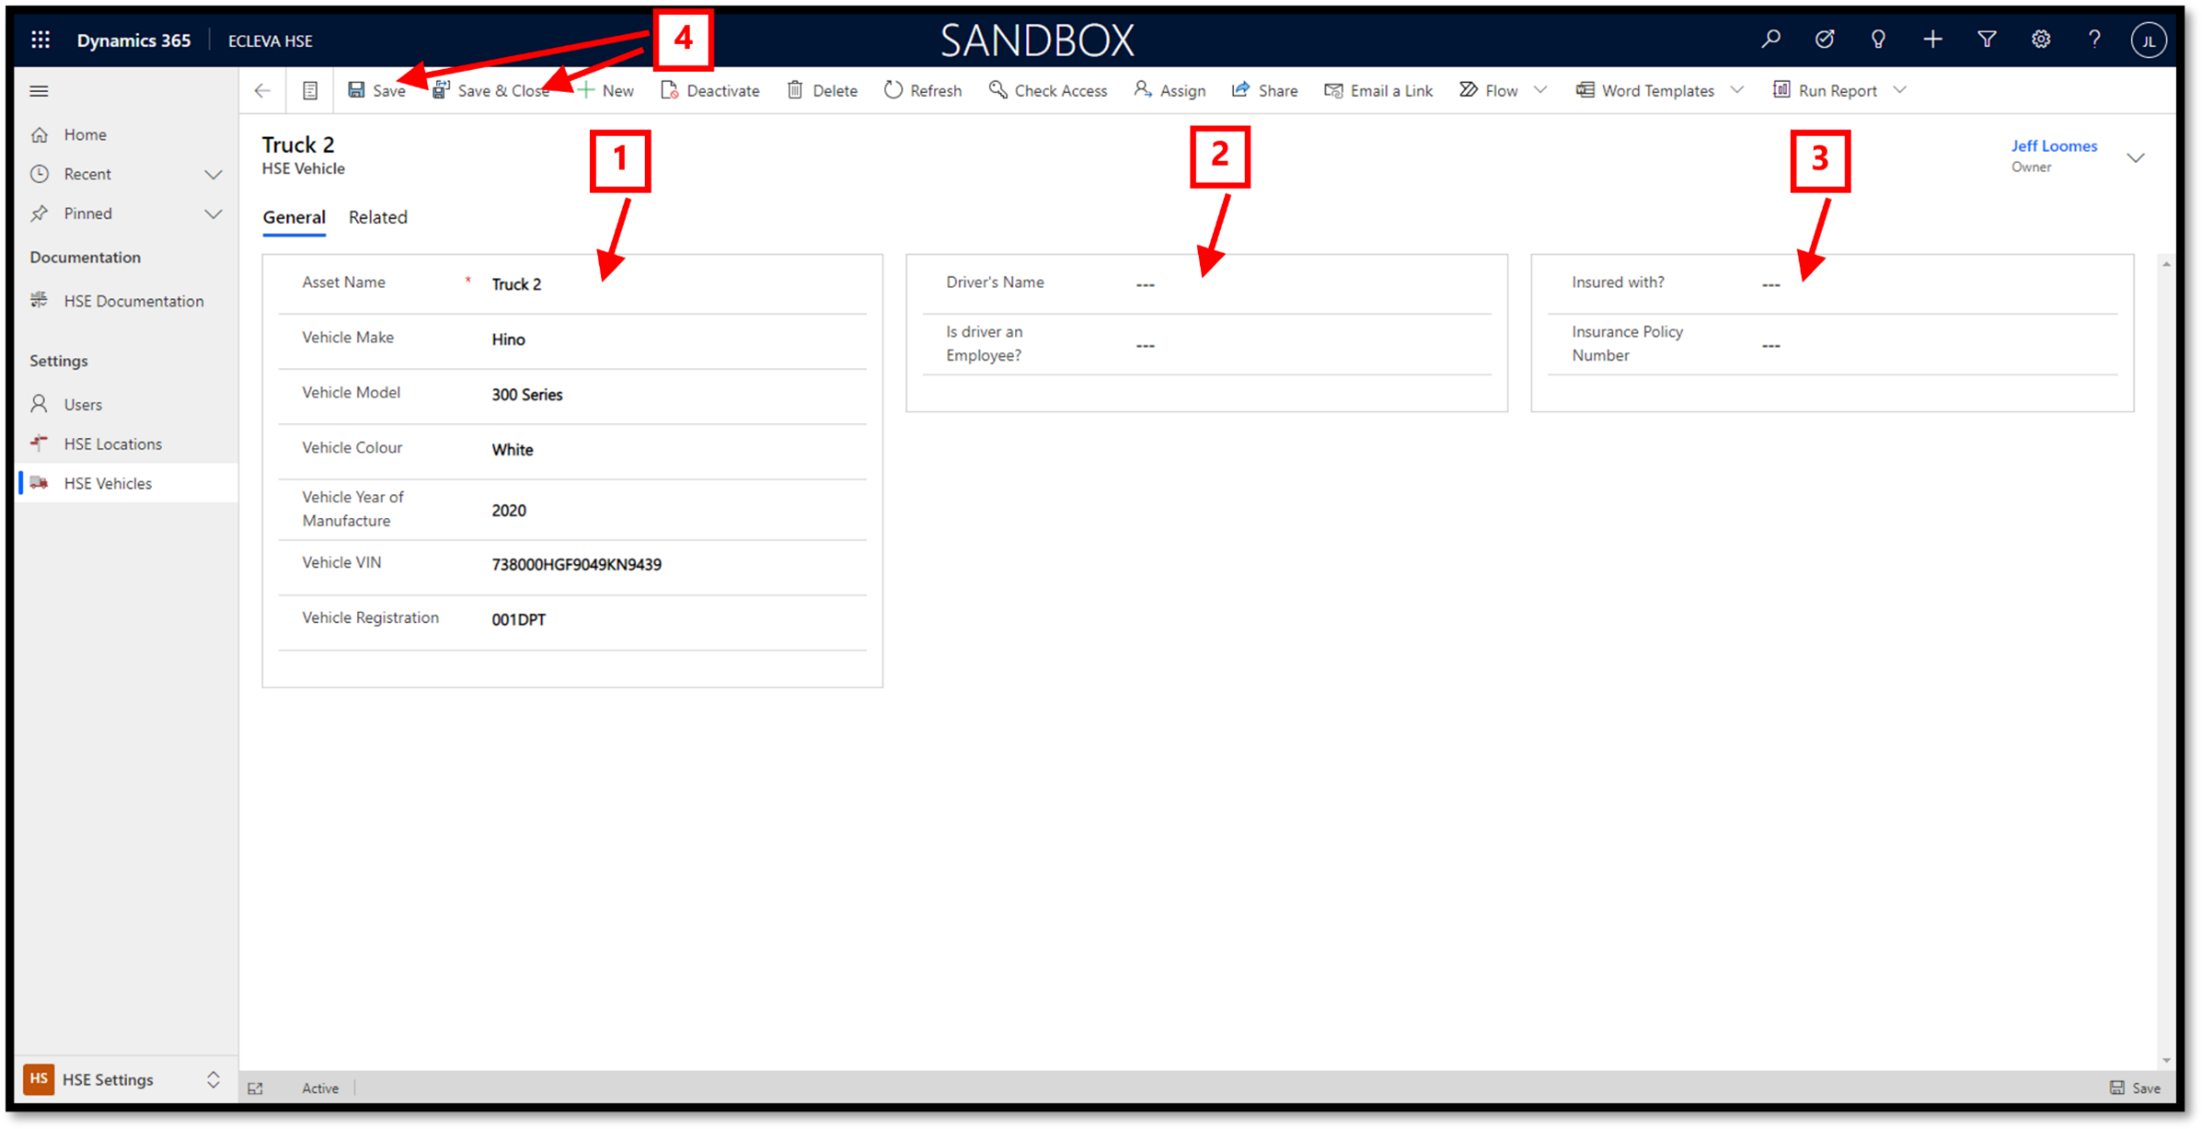
The General tab
You must enter information in all the mandatory fields (those marked with a red *), before you can save the row.
In the General tab enter all the mandatory fields: –
- Name – enter the name that you wish to give this incident.
- Please classify Incident – add the classifications relative to this incident… select one or more classifications if appropriate.
Different classifications will unhide various sections relevant to the selected classes.
- Reported On – enter or select the date on which the incident was reported.
- Supervisor / Manager – enter and select the name of the supervisor or manager… start typing a name to be presented with a list from which to select.
Enter any other relevant information in other fields on this tab, and then click on the Specifics tab.
| Note
• Click on the Save or Save & Close button in the command bar when you have completed entering or updating information. |
The Specifics tab
In the Information section of the Specifics tab, enter any relevant information or click on a toggle to change an answer to a question.
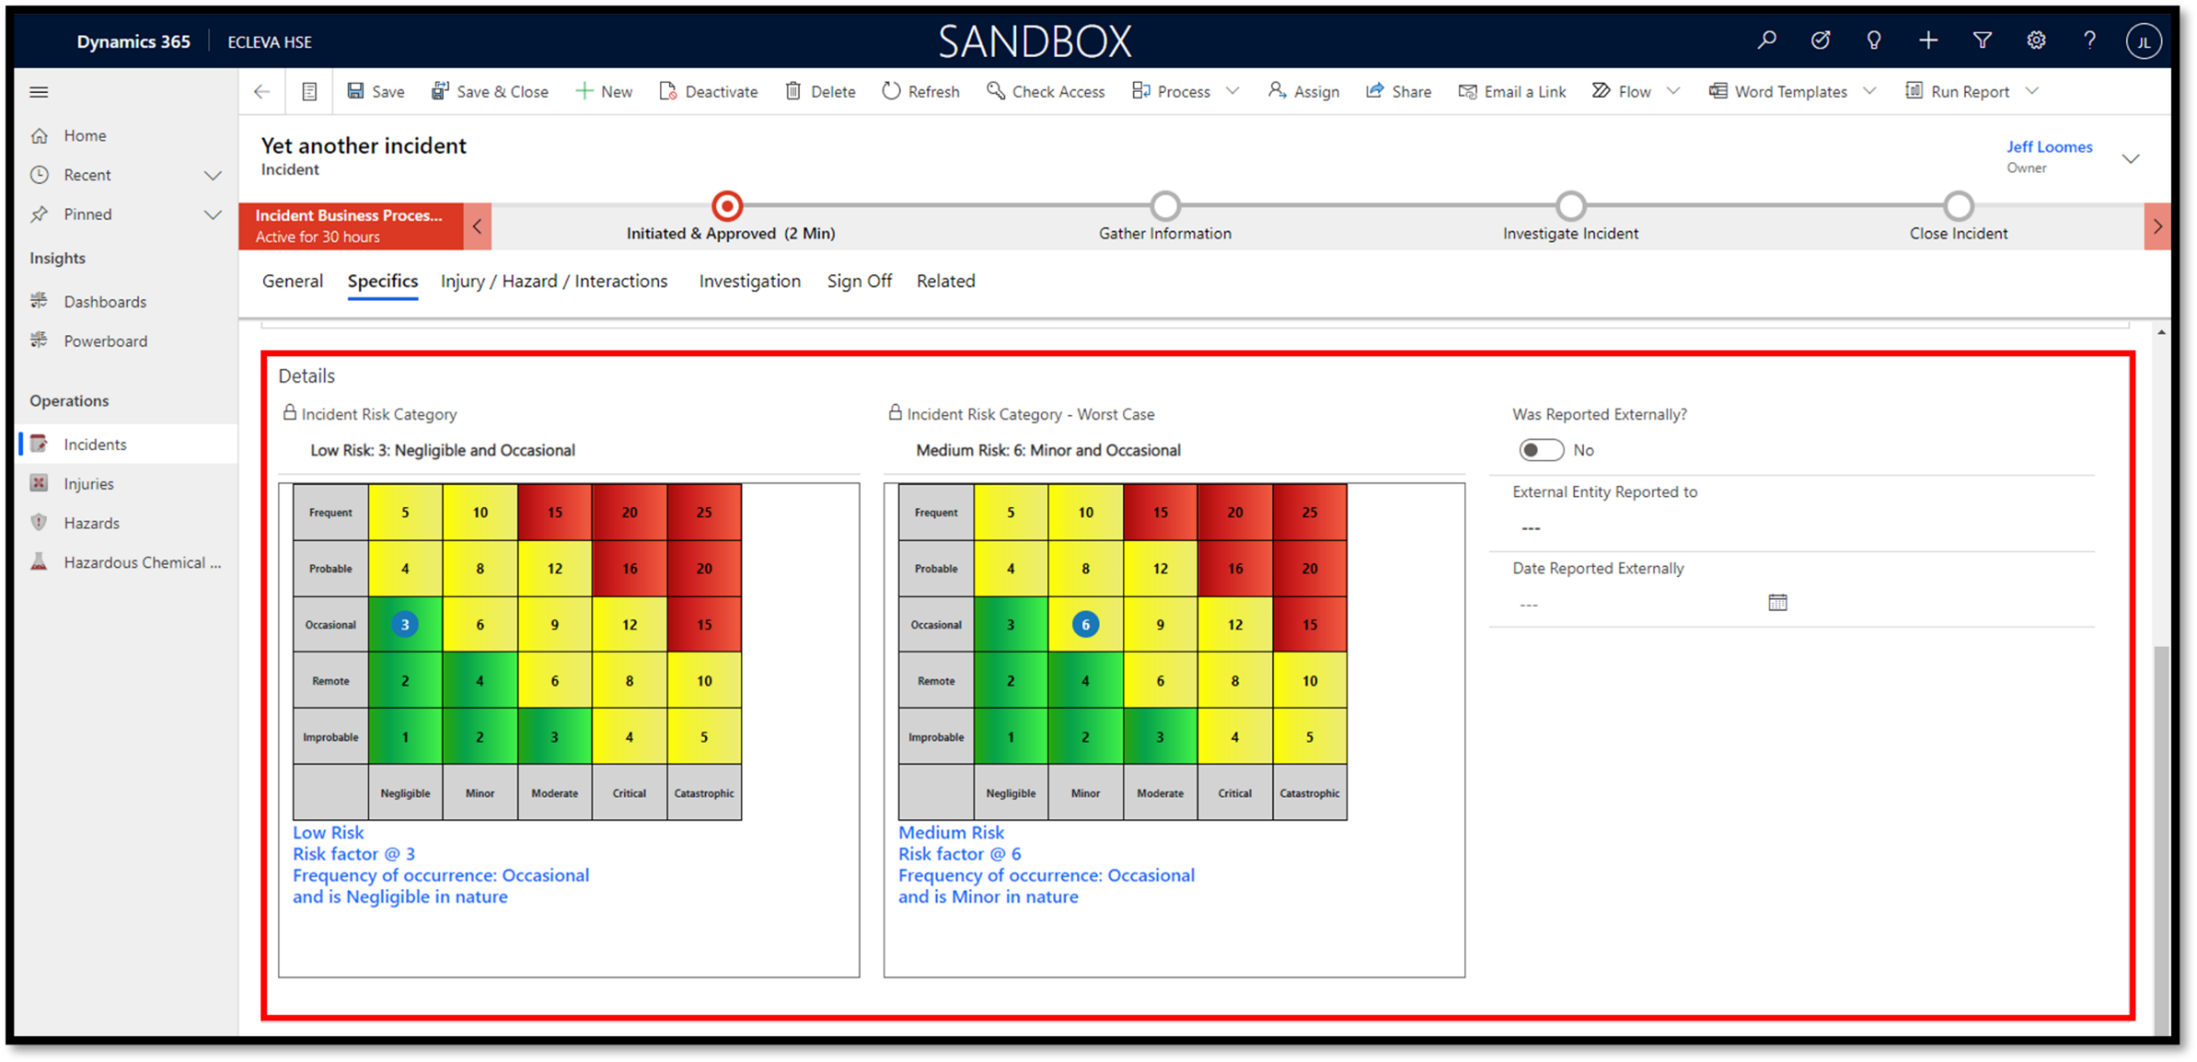
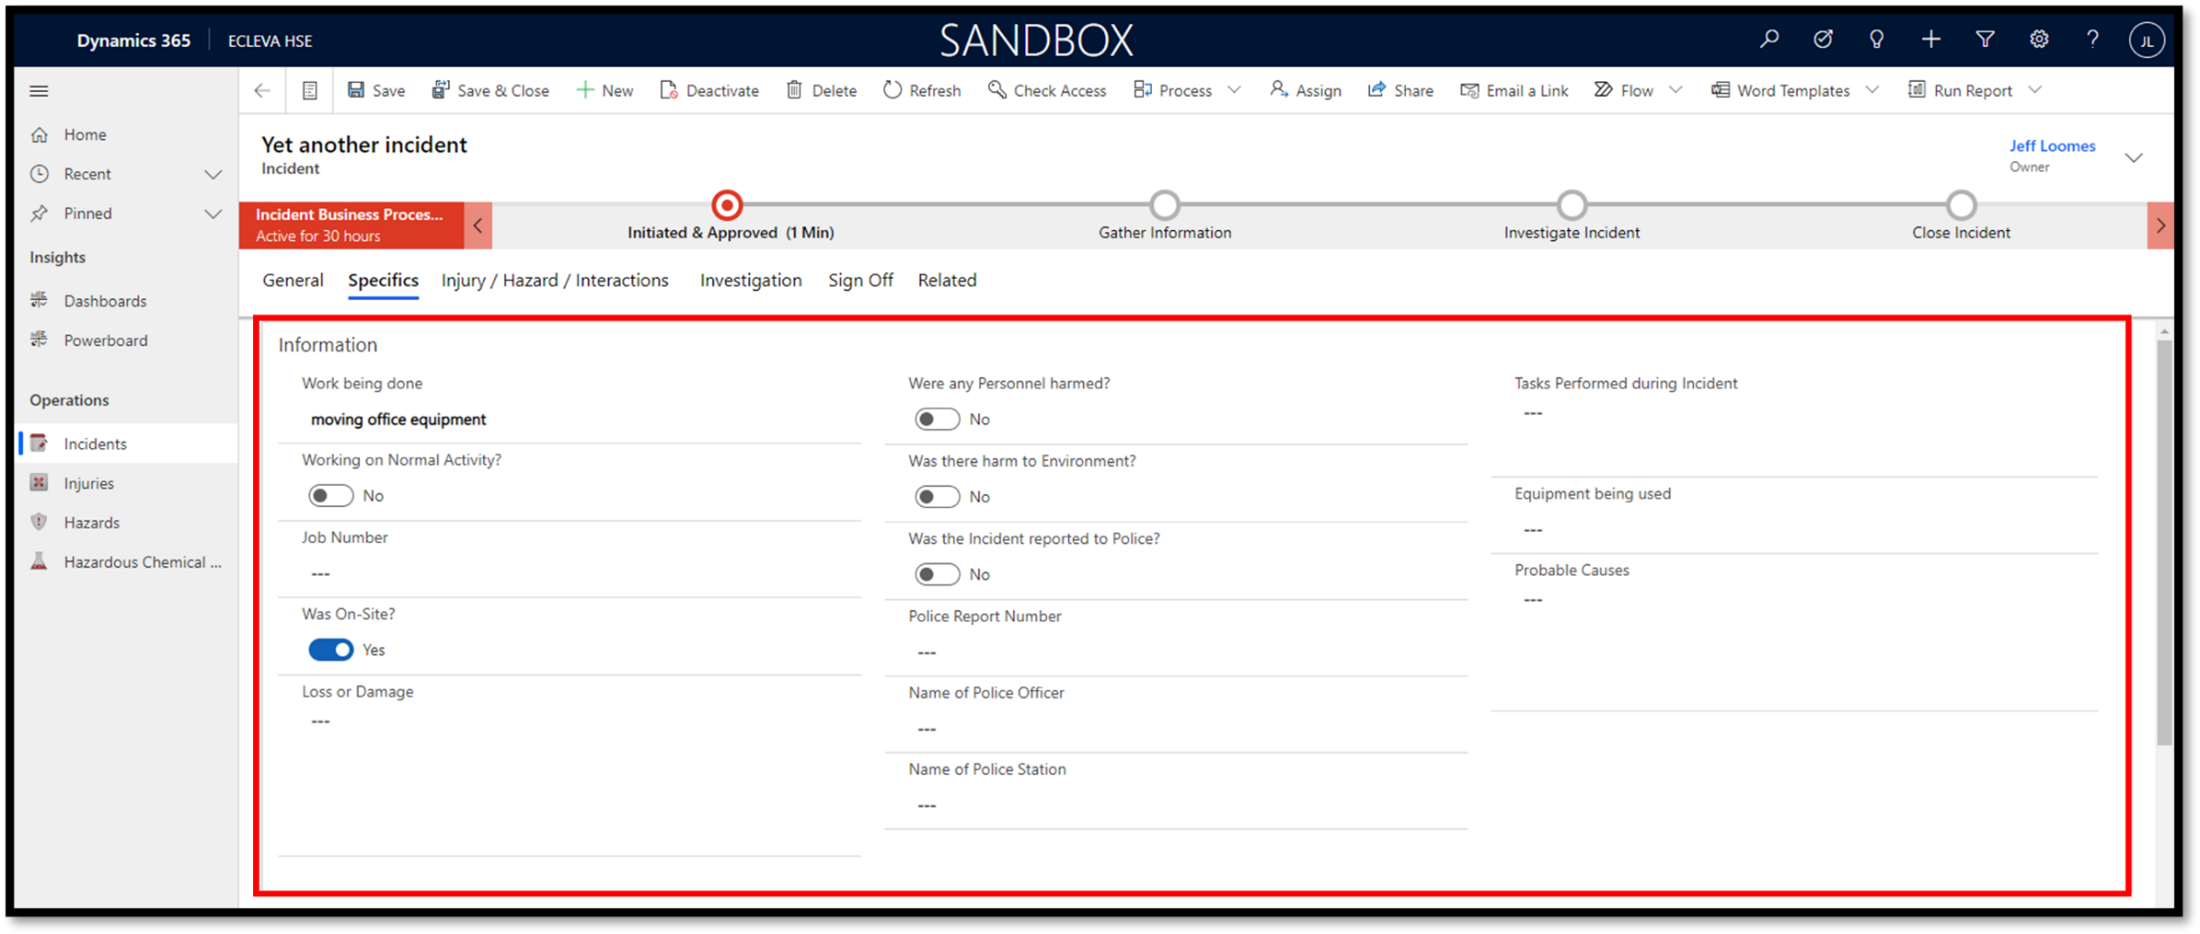 In the Details section of the Specifics tab: –
- select the Incident Risk Category by clicking on a coloured square in the risk matrix… this action will auto fill the text associated with the selected risk matrix number,
- select the Incident Risk Category – Worst Case by clicking on a coloured square in the risk matrix… this action will auto fill the text associated with the selected risk matrix number,
- select the Was Reported Externally (Yes or No) by clicking on the toggle, and
- enter the External Enity Report To name, and
- enter or select a date for the Date Reported Externally
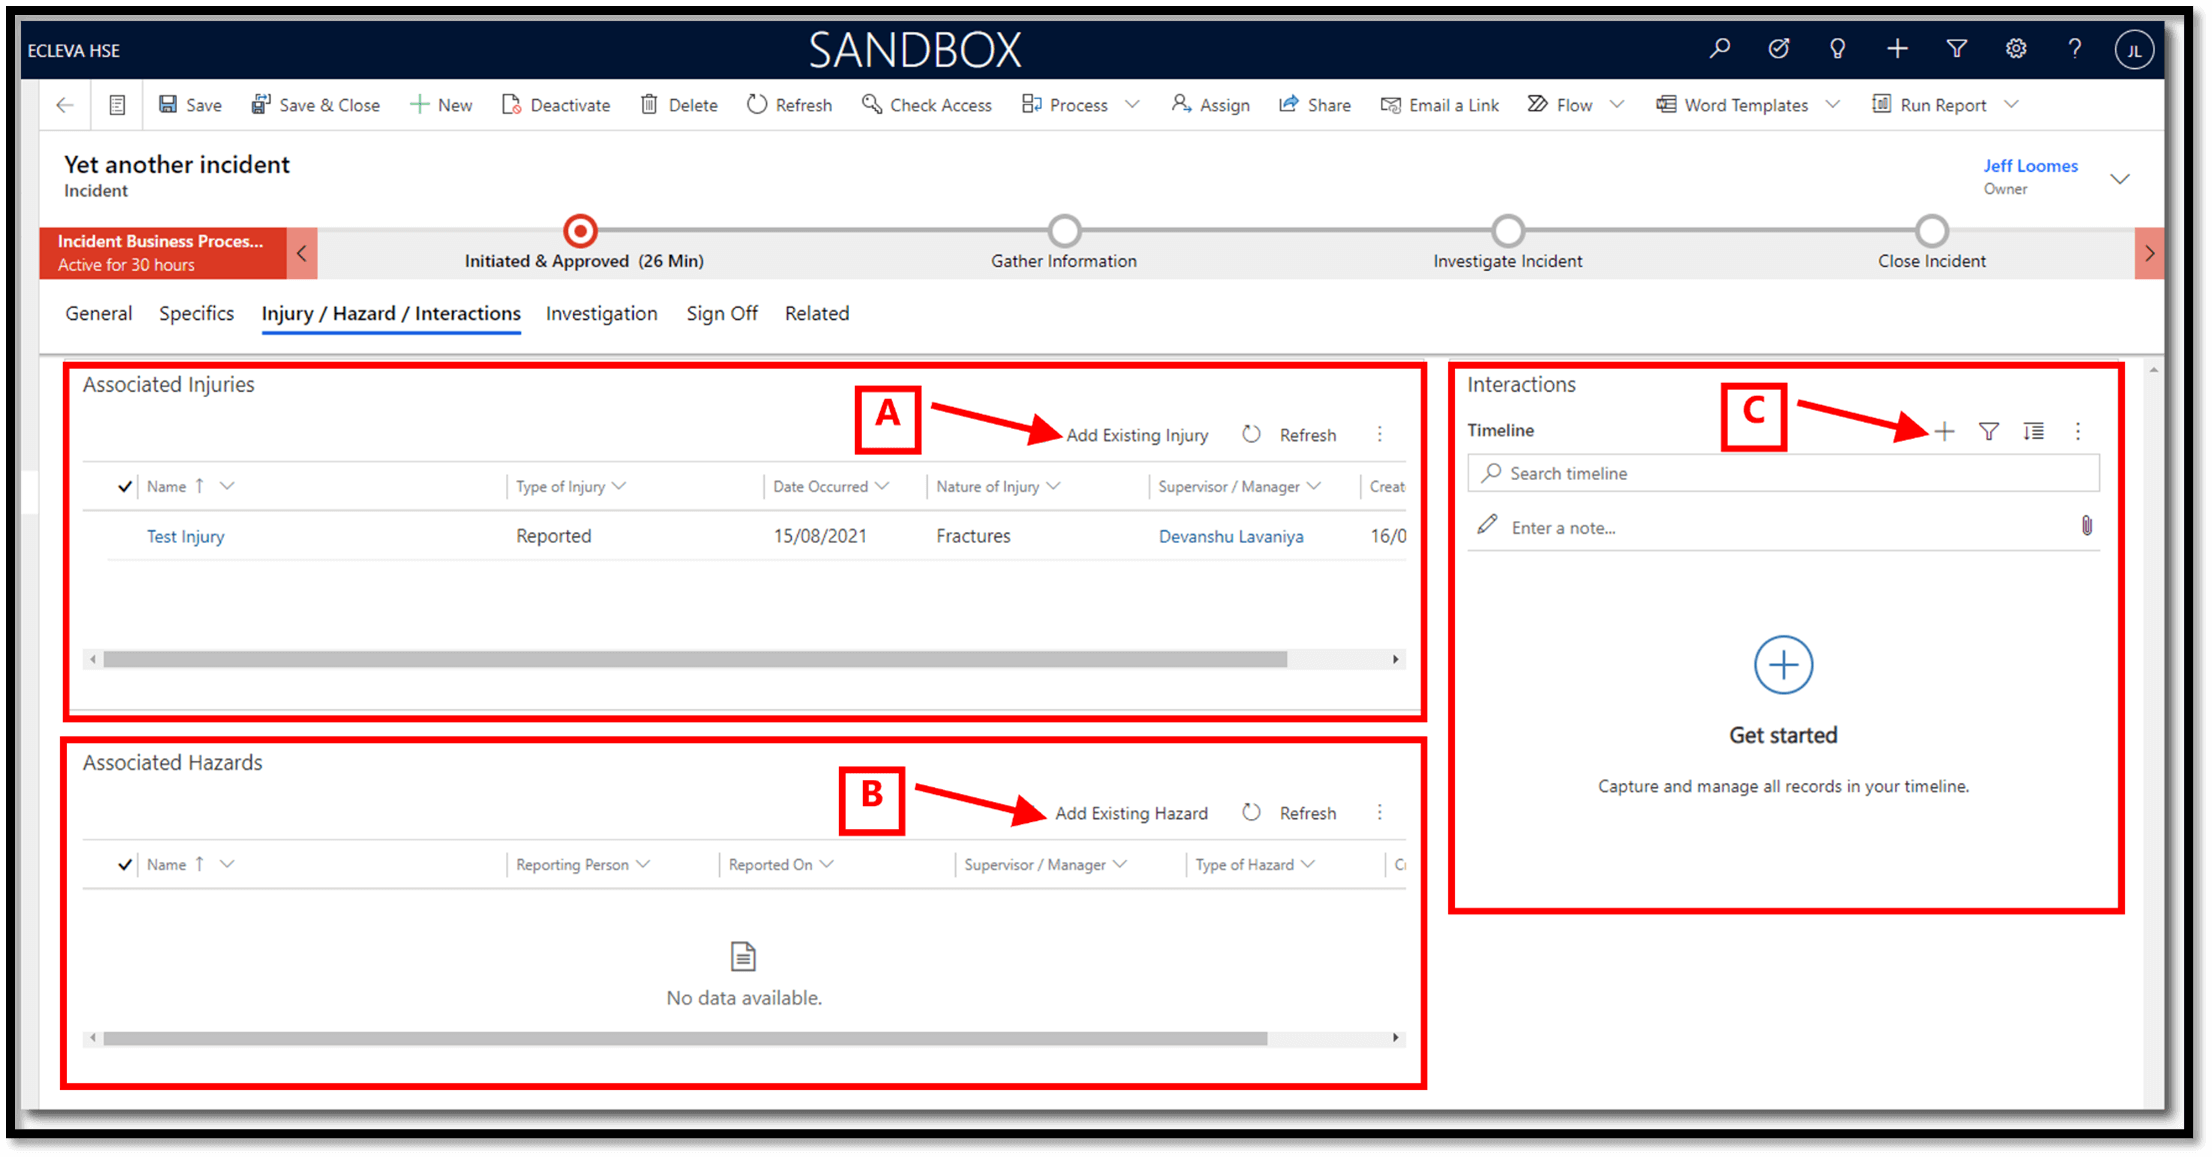
The Injury/Hazard/Interactions tab
In the Injury/Hazard/Interactions tab, you can: –
- Add one or more existing Injury records by clicking on the Add Existing Injury option in the Associated Injuries
- Add one or more existing Hazard records by clicking on the Add Existing Hazard option in the Associated Hazards
- Add one or more new Notes or Activities by clicking on the + icon in the Interactions
| Note
• You can only add existing injury or hazard records, and new Notes or Activities, once the incident has been saved.
• Click on the Save or Save & Close button in the command bar when you have completed entering or updating information. |
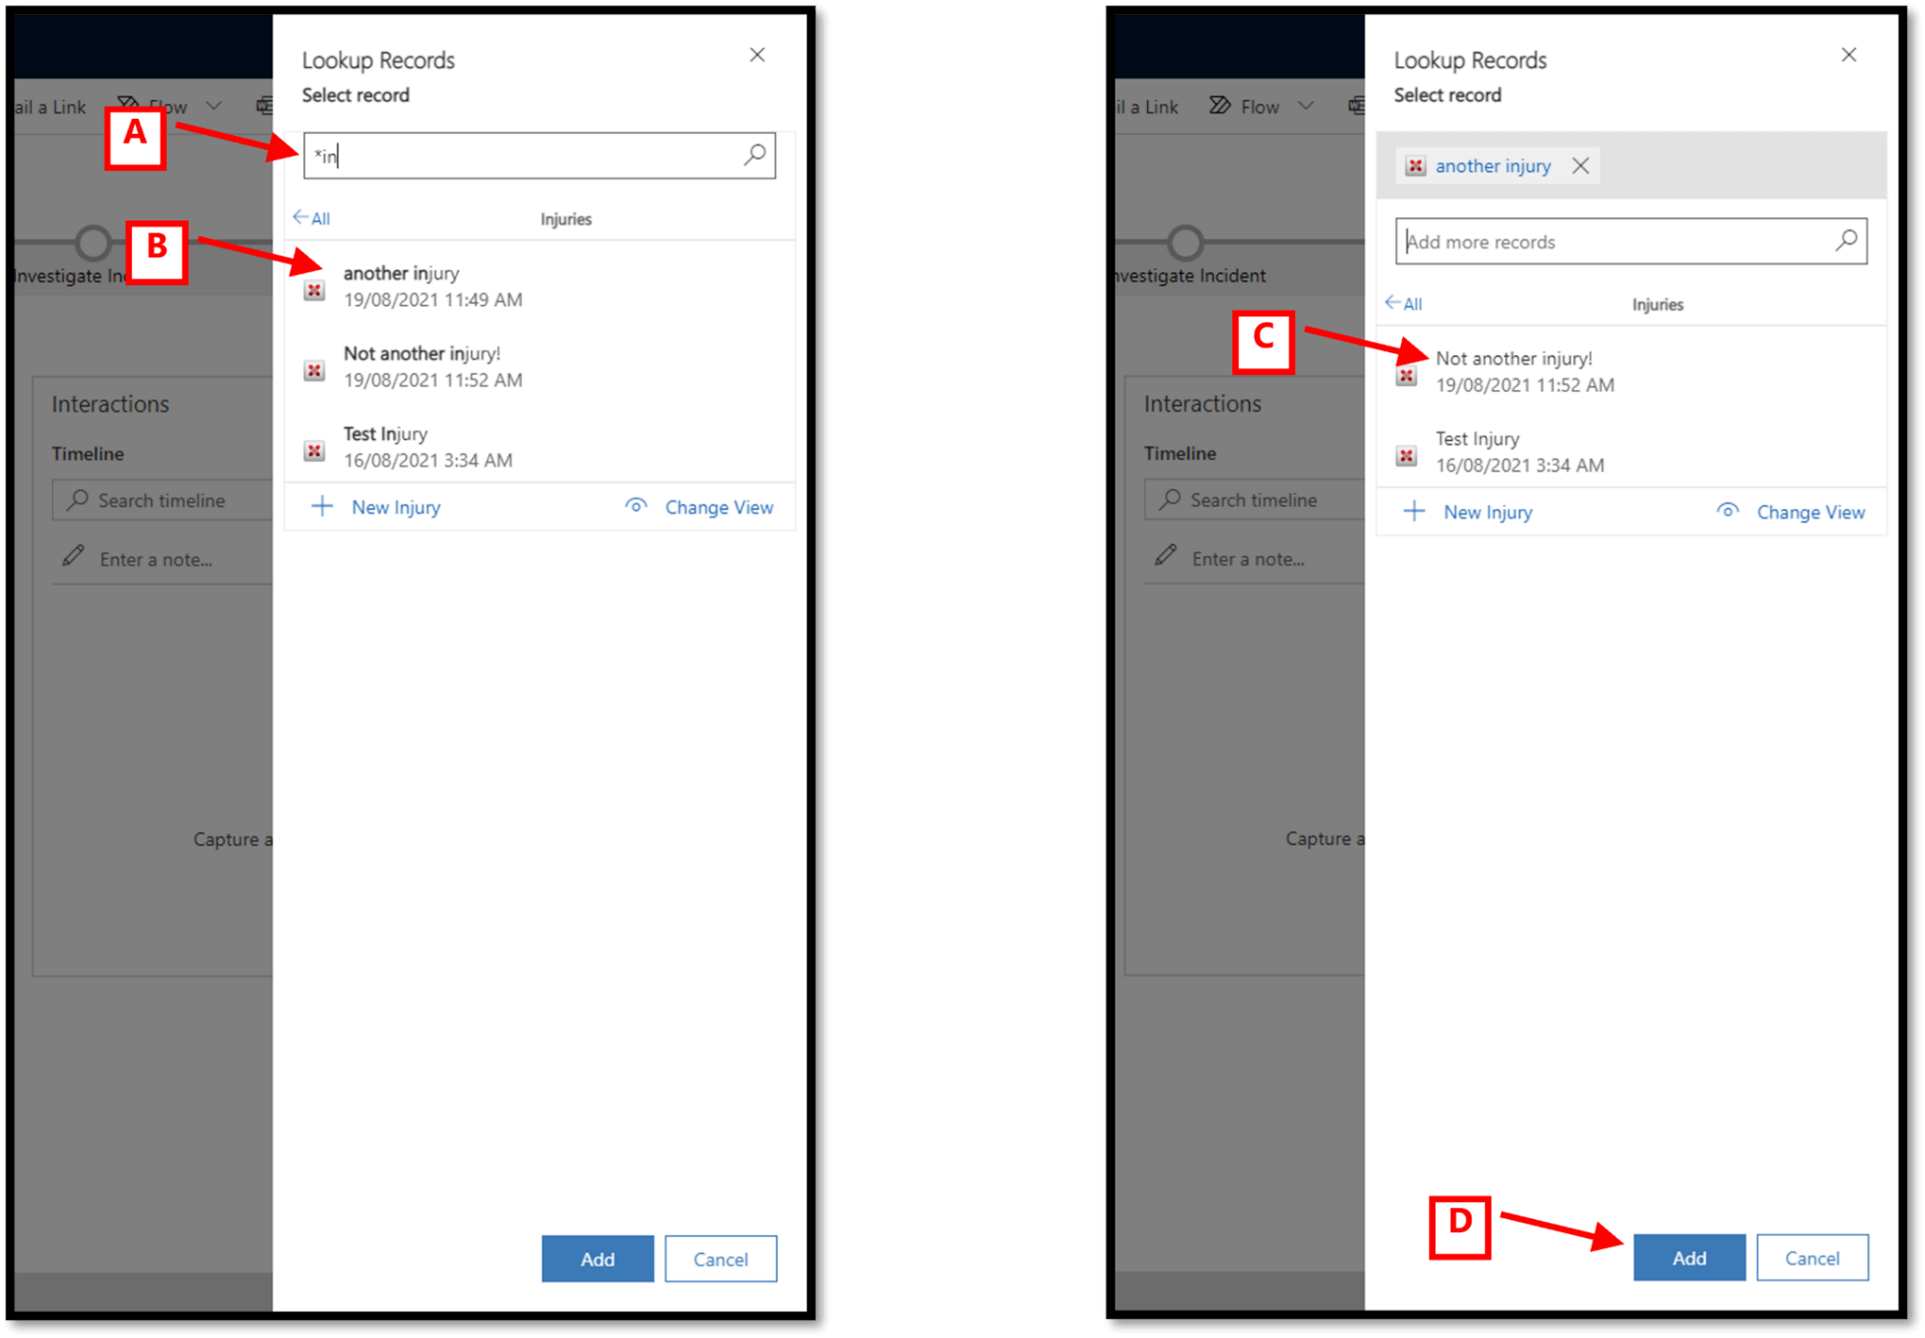
Adding an existing Injury to an Incident
After clicking on the Add Existing Injury option, a Lookup Records form will slide in from the right side of your screen… you will need to find and select the injury record(s) by: –
- Entering your search string into the “Look for records” box.
- Clicking on a displayed record to select that record, or revise your search string if the required record is not displayed.
- Clicking on another displayed record to select that record, or enter a new search string into the “Add more records” box.
- Clicking on the Add button to associate the selected record(s) with this incident
| Note
• Add an * to the beginning of a search string to look for the string with the name of an injury. |
Adding an existing Hazard to an Incident
After clicking on the Add Existing Hazard option, a Lookup Records form will slide in from the right side of your screen… you will need to find and select the injury record(s) by: –
- Entering your search string into the “Look for records” box.
- Clicking on a displayed record to select that record, or revise your search string if the required record is not displayed.
- Clicking on another displayed record to select that record, or enter a new search string into the “Add more records” box.
- Clicking on the Add button to associate the selected record(s) with this incident
| Note
• Add an * to the beginning of a search string to look for the string with the name of an injury. |

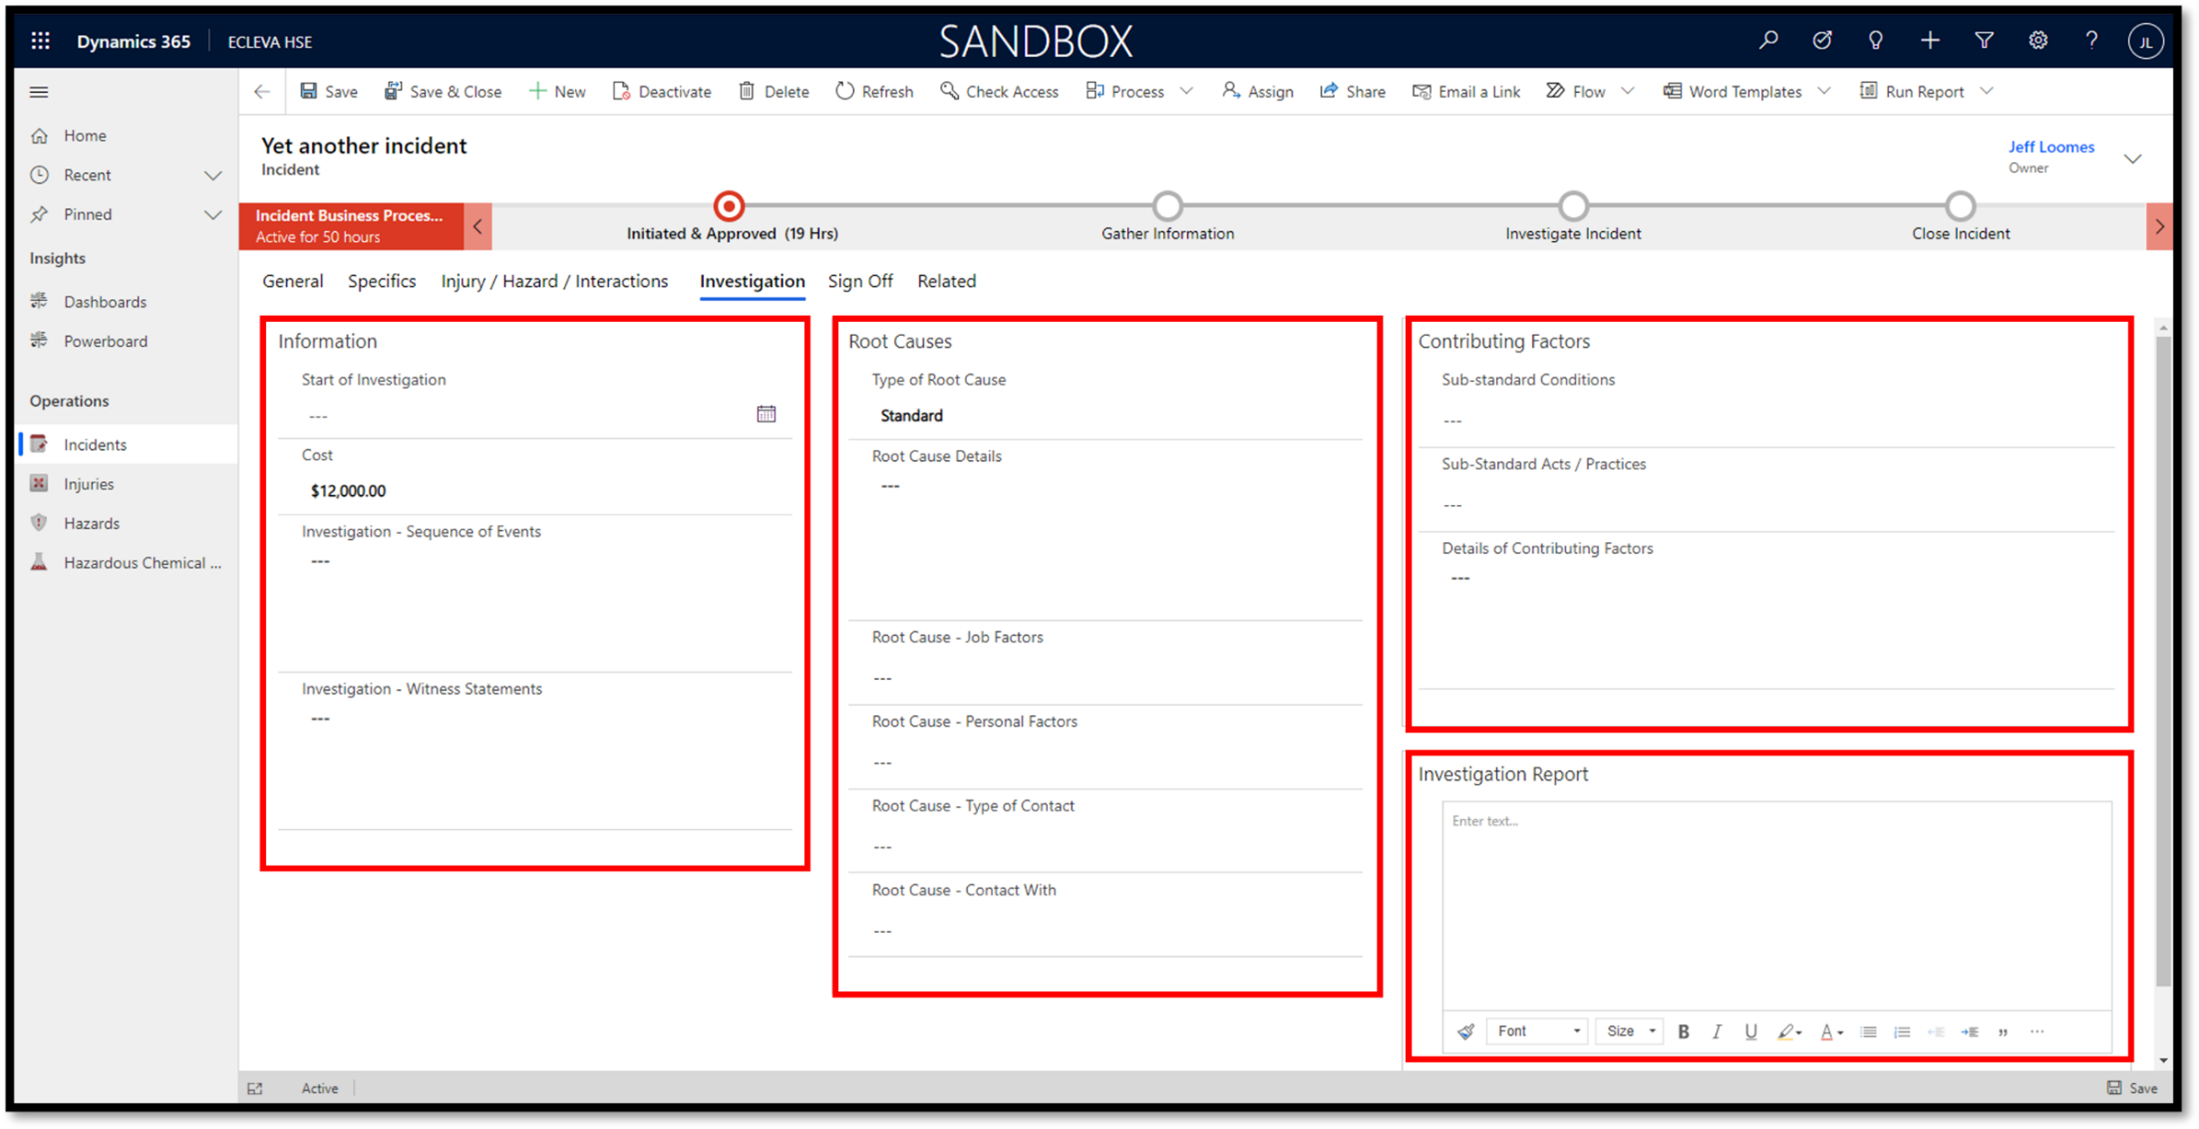
The Investigation tab
In the Information, RootCauses, Contributing Factors, and Investigation Report sections of the Investigation tab, enter any relevant information or select options from the dropdown lists.
| Note
• Click on the Save or Save & Close button in the command bar when you have completed entering or updating information. |
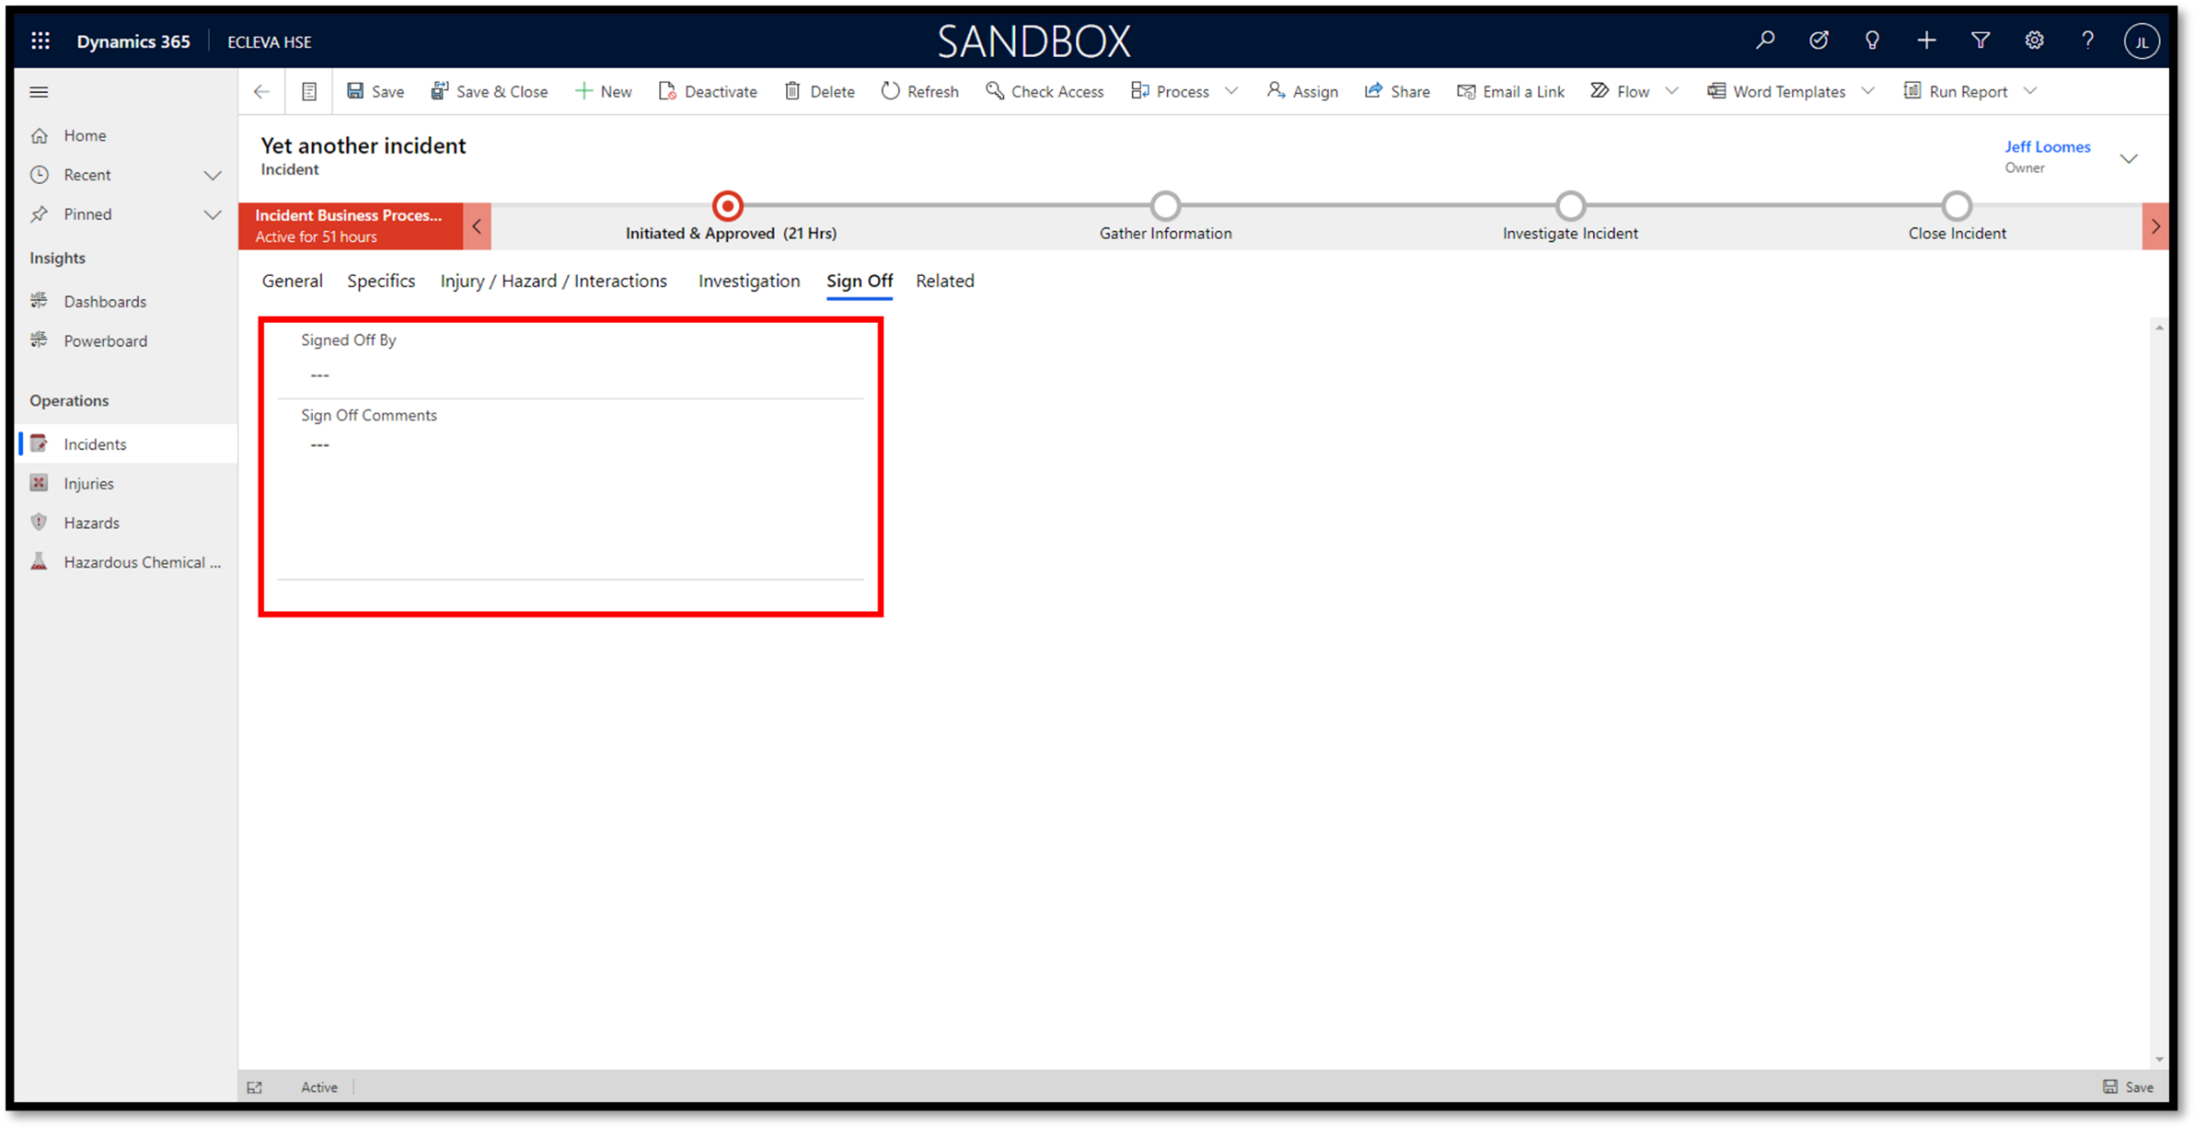
The Sign Off tab
In the Sign Off tab, select the person signing off the incident, and enter any relevant comments.
| Note
• Click on the Save or Save & Close button in the command bar when you have completed entering or updating information. |
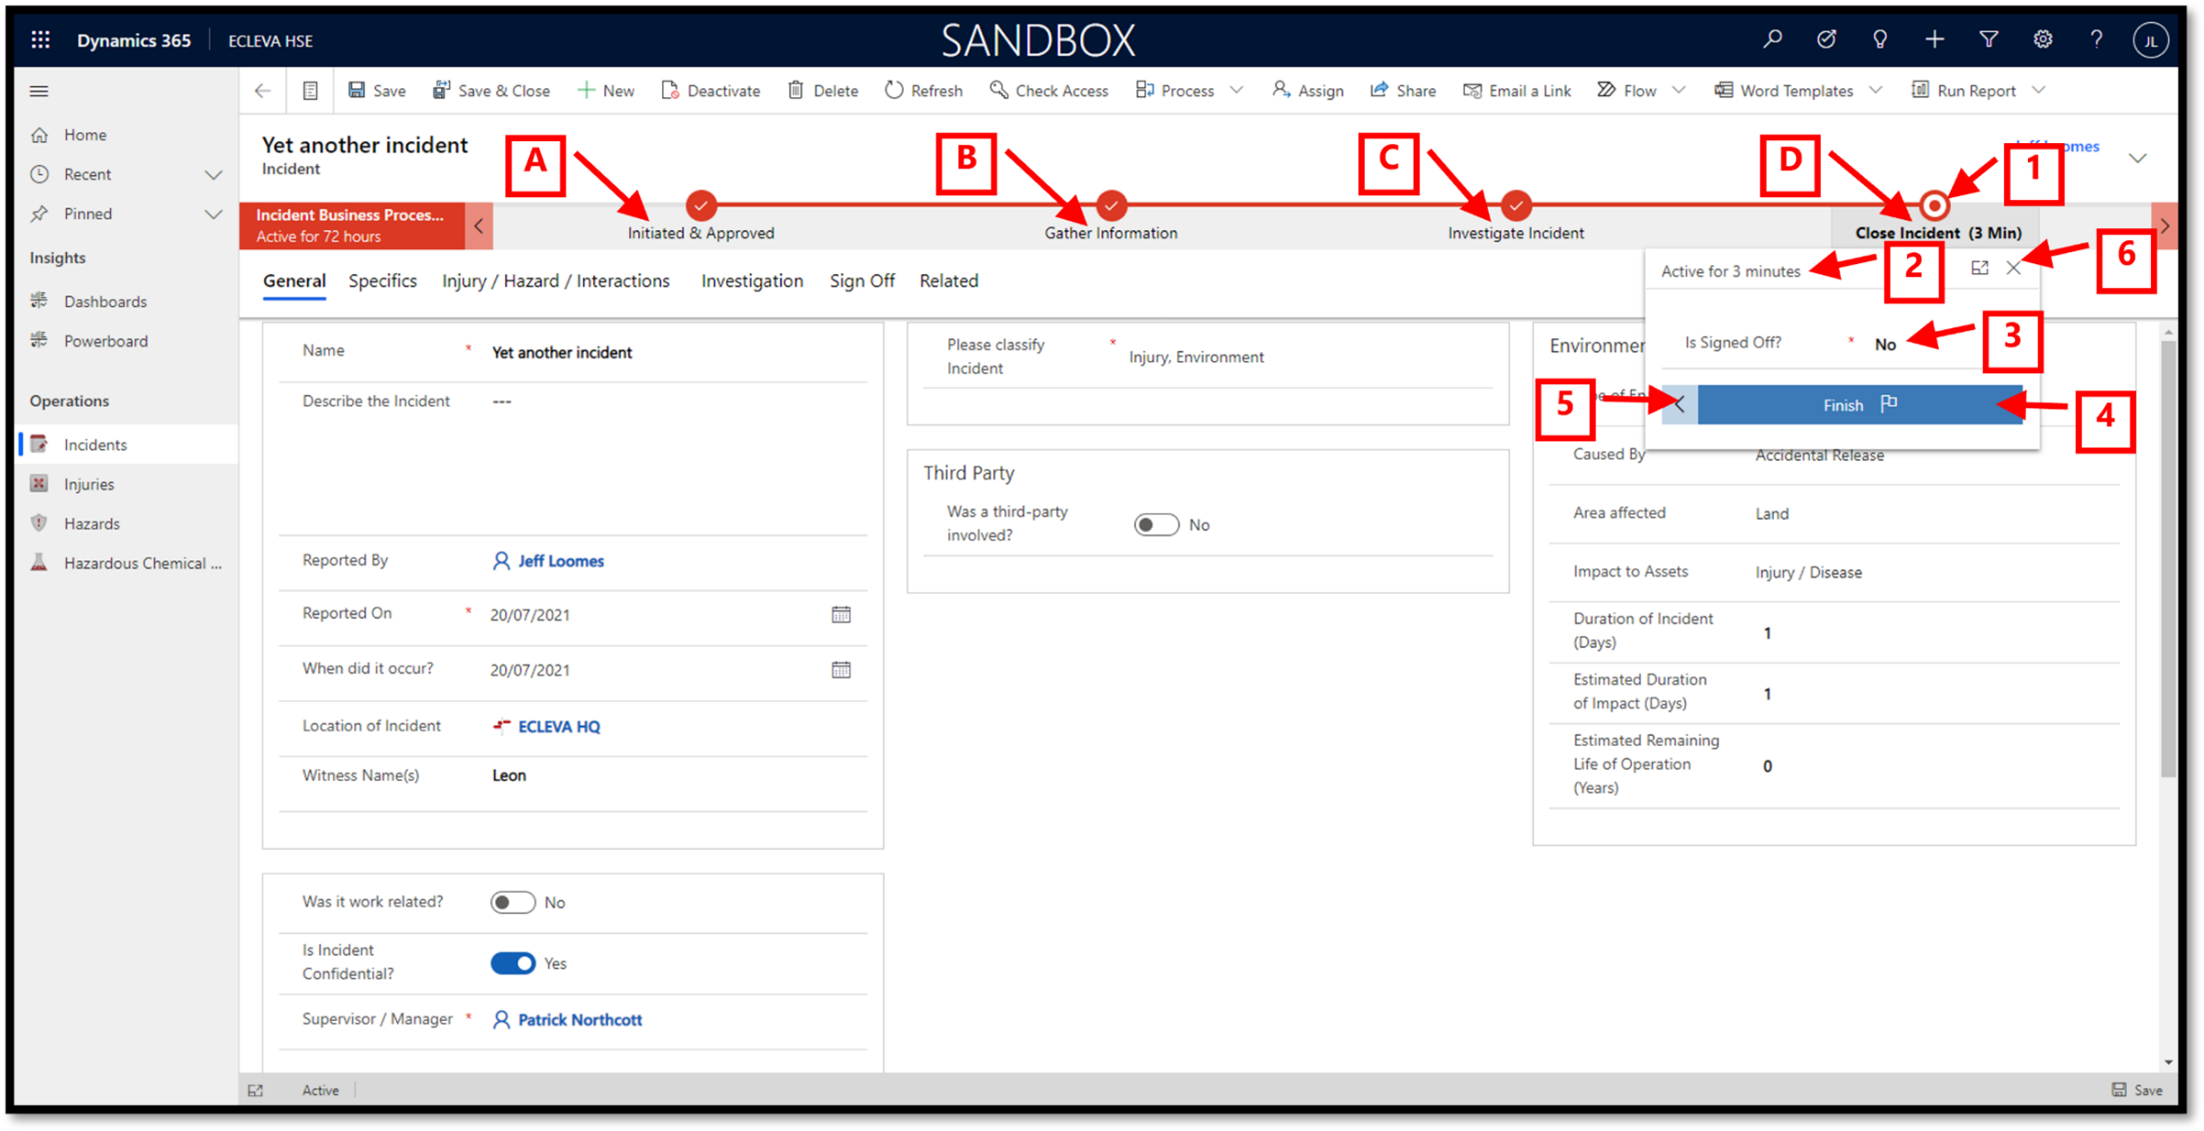
The Incident Business Process Flow
The incident business process flow provides a guided experience for completing an incidents stages.
- Initiated & Approved
- Gather Information
- Investigate Incident
- Close Incident
The stage elments.
- The current stage is easily identified by a red target, as seen in the example incident below.
- The length of time that the incident has been on this stage is displayed at the top of the focus list.
- Each stage of the business process flow can contain one or more focus fields that require your attention before moving to the next stage.
Only the focus fields in the current stage are editable from the focus list.
- Click on the Next Stage button to change the focus to the next stage.
or
Click on the Finish button to complete the Iincident, when you are ready.
- Click on the < (back) button, where available, to revert back to a previous stage.
- To close the focus list, click on the X at the top right corner of the focus list.
| Note
• The focus fields can be viewed by clicking on each of the stage points (A, B, C, or D) at any time throughout the process. |
 Injuries
The Injury table type is where you can manage your Injury rows by viewing, updating, deleting and creating new rows (records).
The Active Injury view
The Active Injury view displays all existing injury rows.
| Note
• You may have to use paging, backward or forward, to see all existing injury rows. |
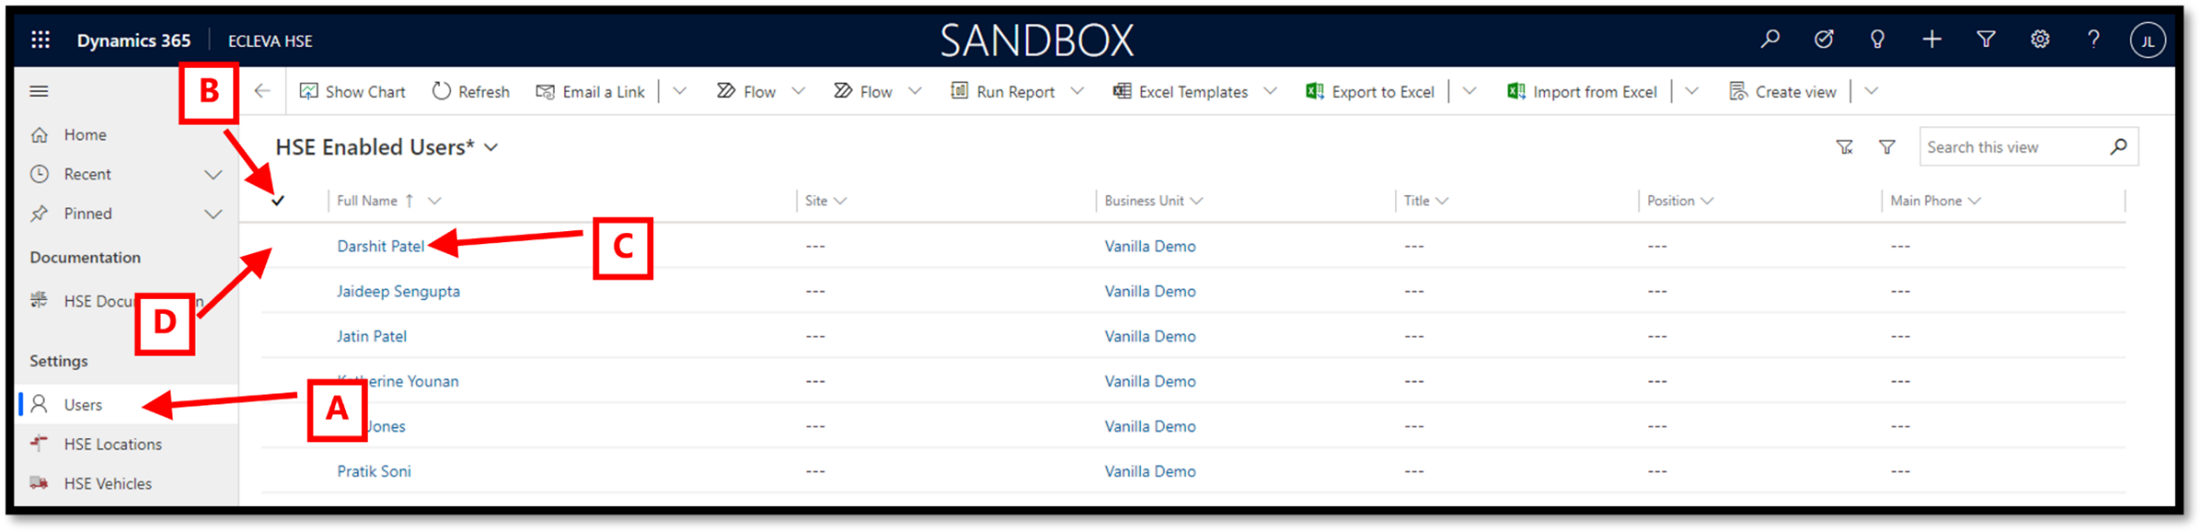
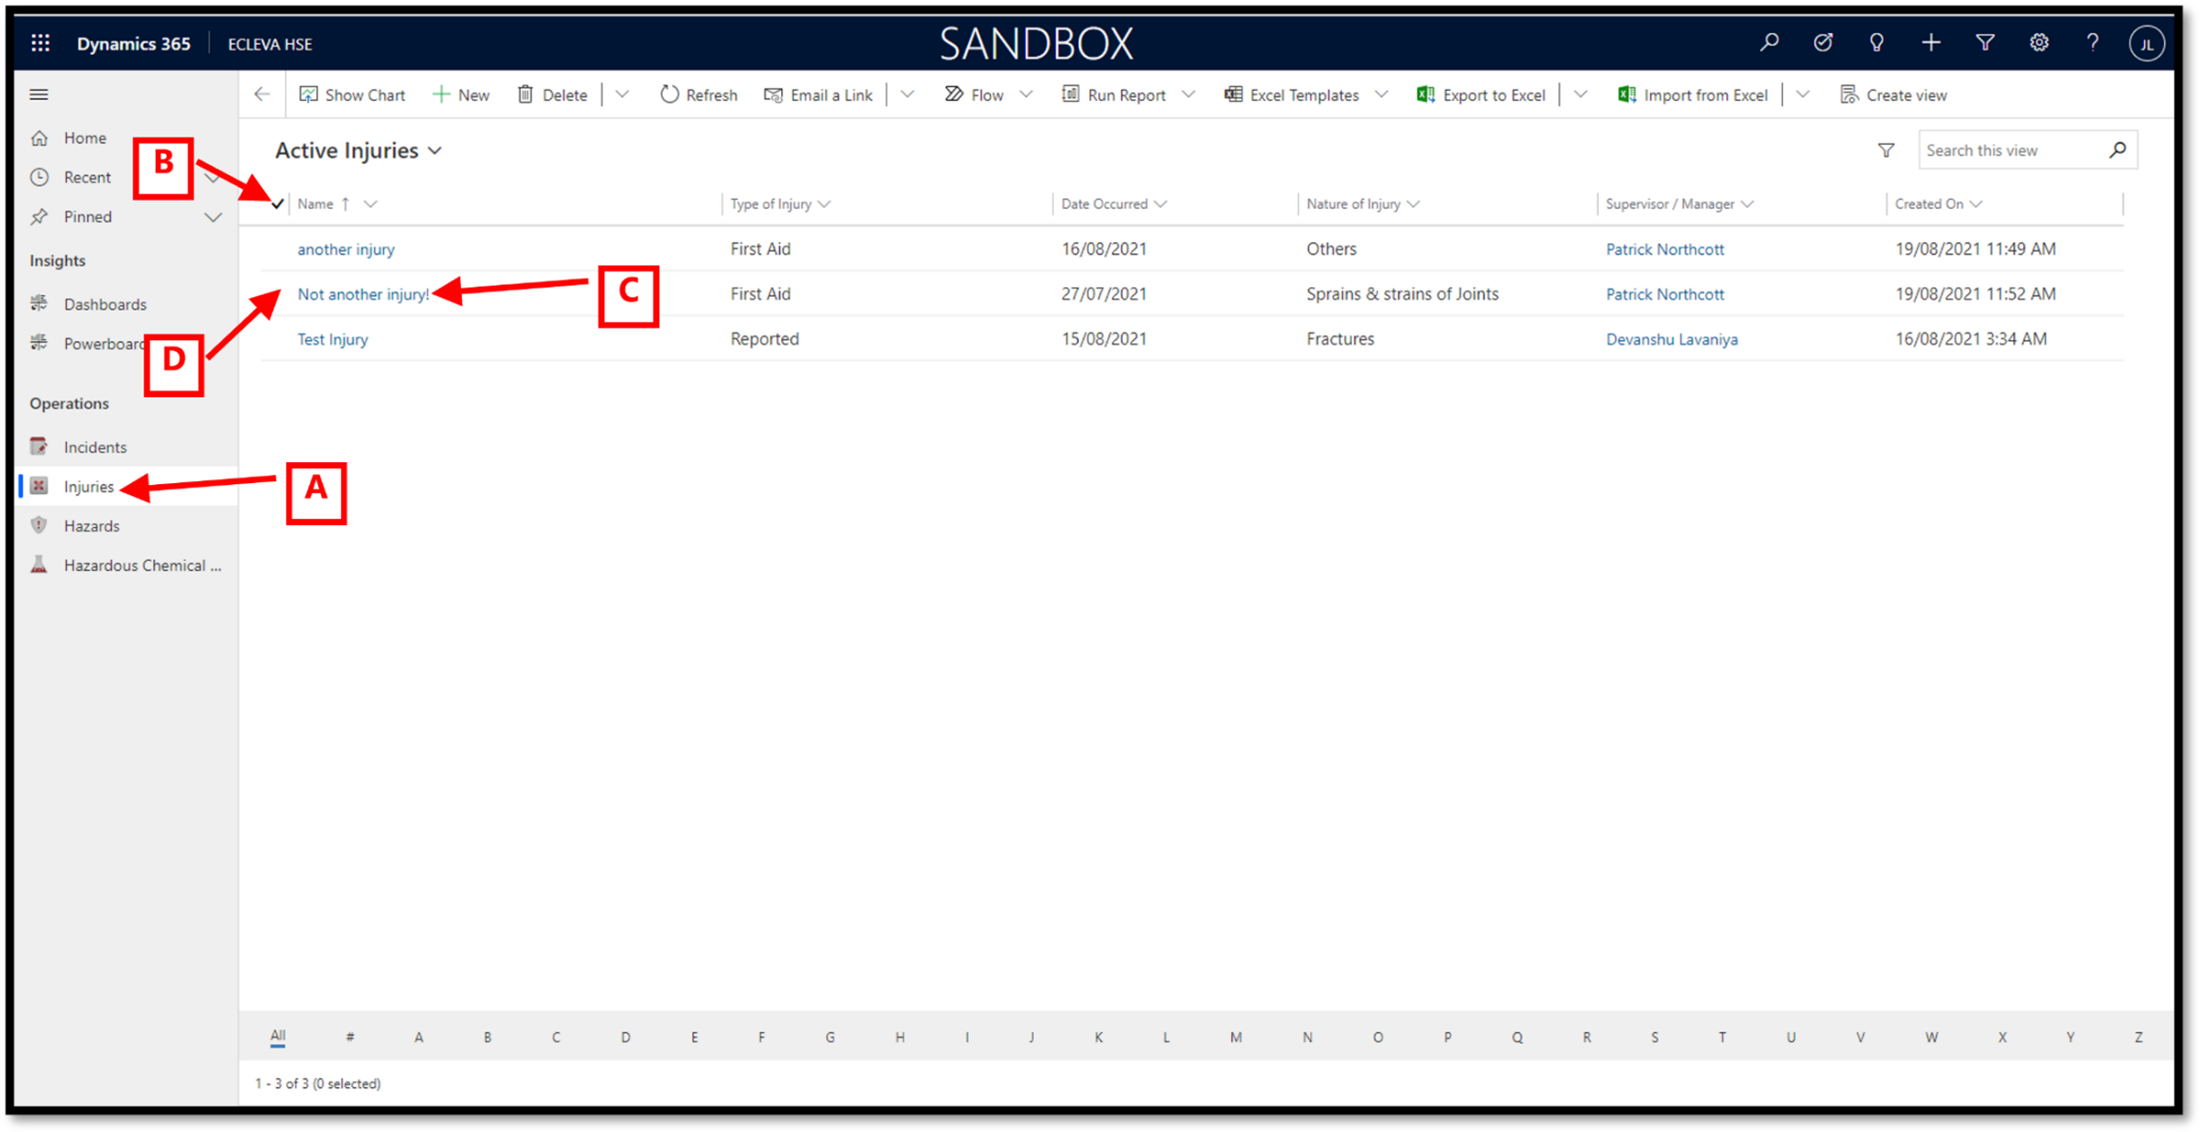
- Click on the Injuries option in the Sitemap to view existing rows.
- Click on the Tick icon to select all rows in the currently view.
Click on the Tick icon again to deselect all rows displayed.
- Click on the injury Name to open that row.
- Select a single row in the current view by: –
Clicking to the left of the name column, on any given row, to select that row.
or
Click in the white space on any given row, to select that row.
Select multiple rows by holding down either the Shift or Ctrl button and selecting a row.
| Note
• Selecting one or more rows will change the available command bar buttons.
• Your assigned permissions control the visible command bar buttons. |
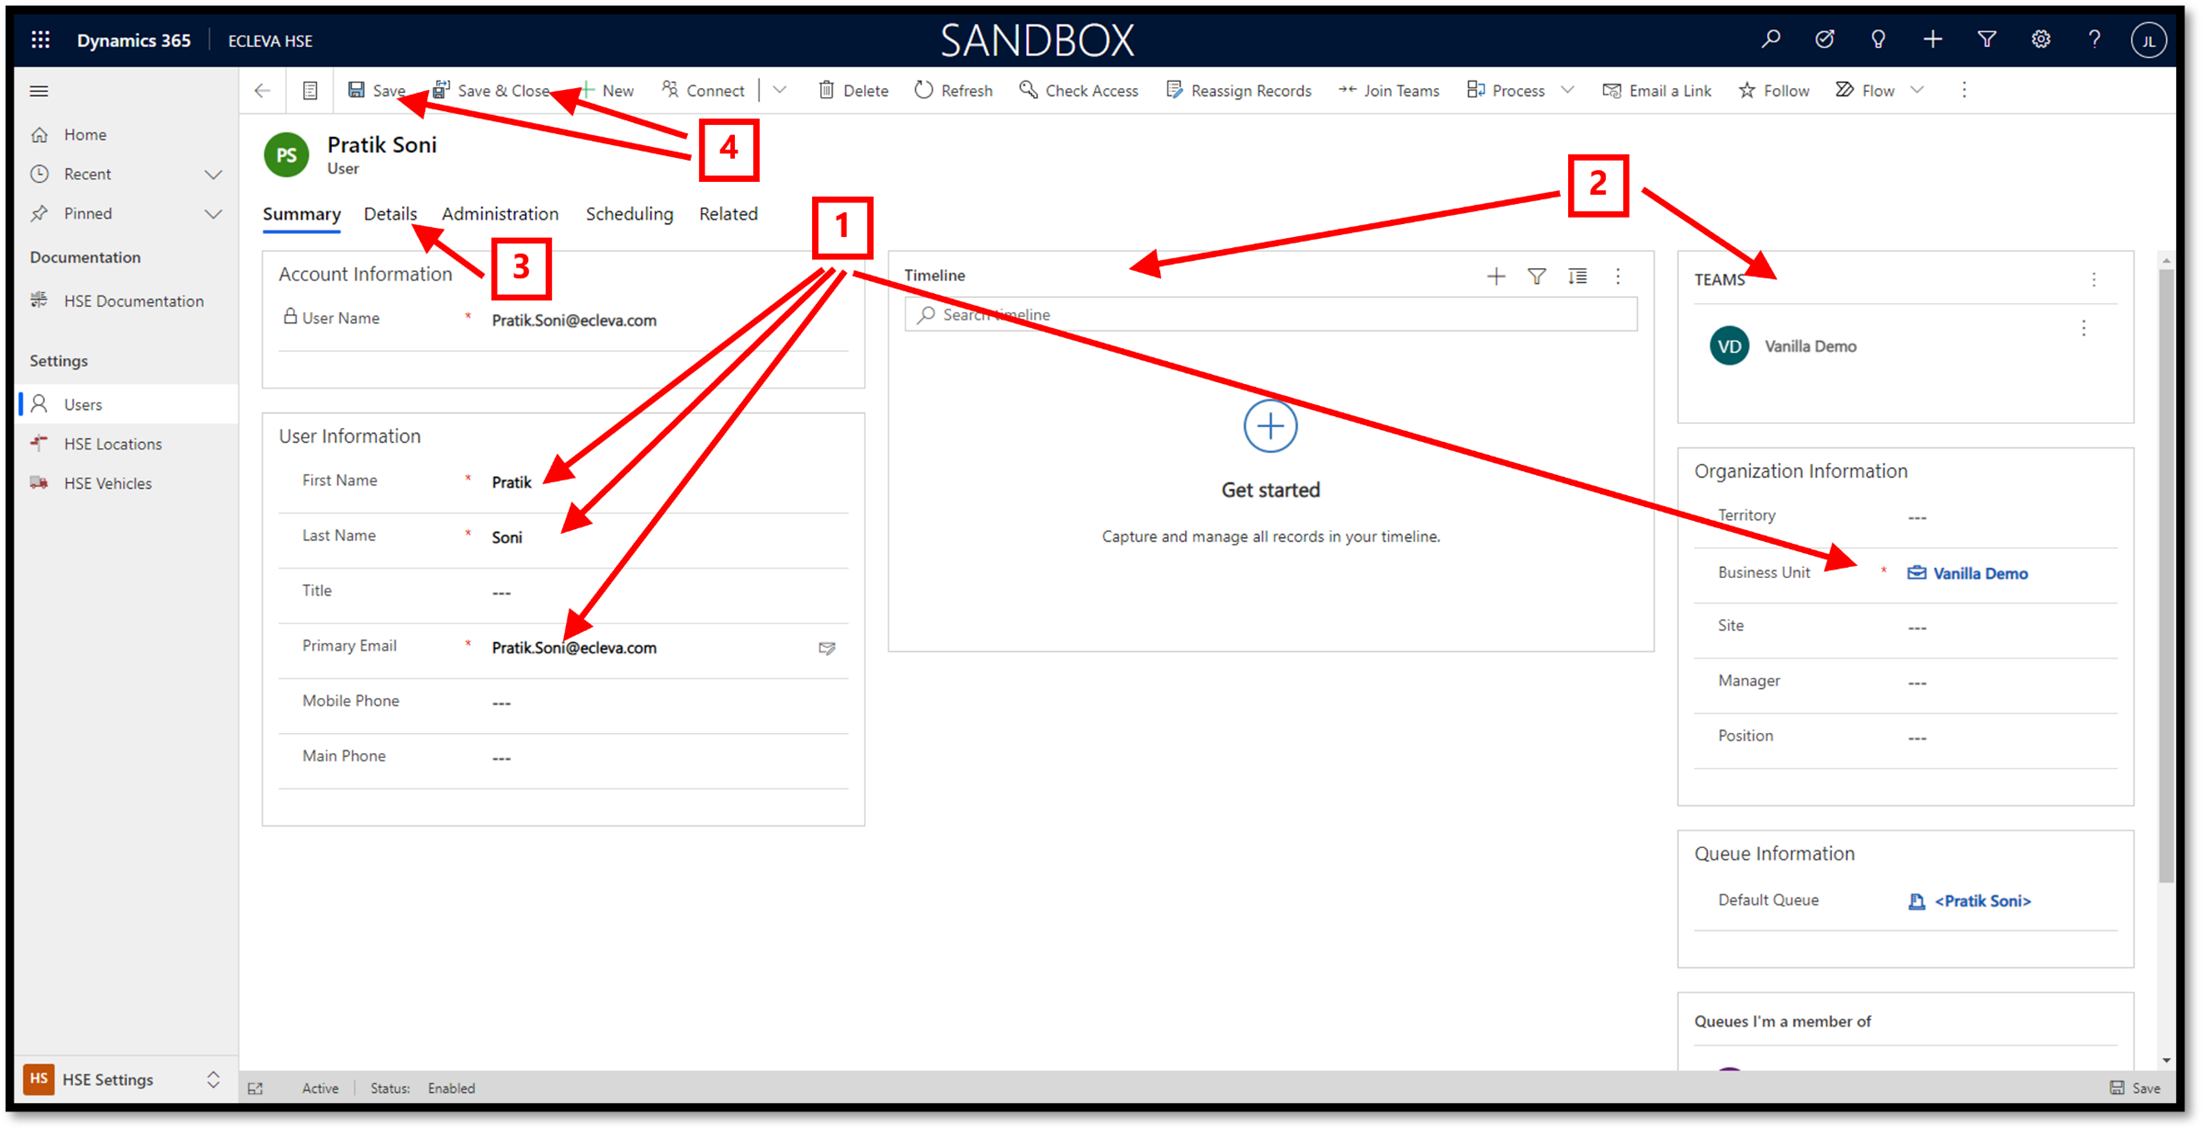
Creating a new Injury record from an injury view
- You can add new injury rows by clicking on the +New button in the command bar… this action will open a blank Injury form.

Creating a new Injury record from an open injury record
- You can also add a new injury record by clicking on the +New button in the command bar… this action will check the open injury record for any unsaved changes, before opening a blank injury record.

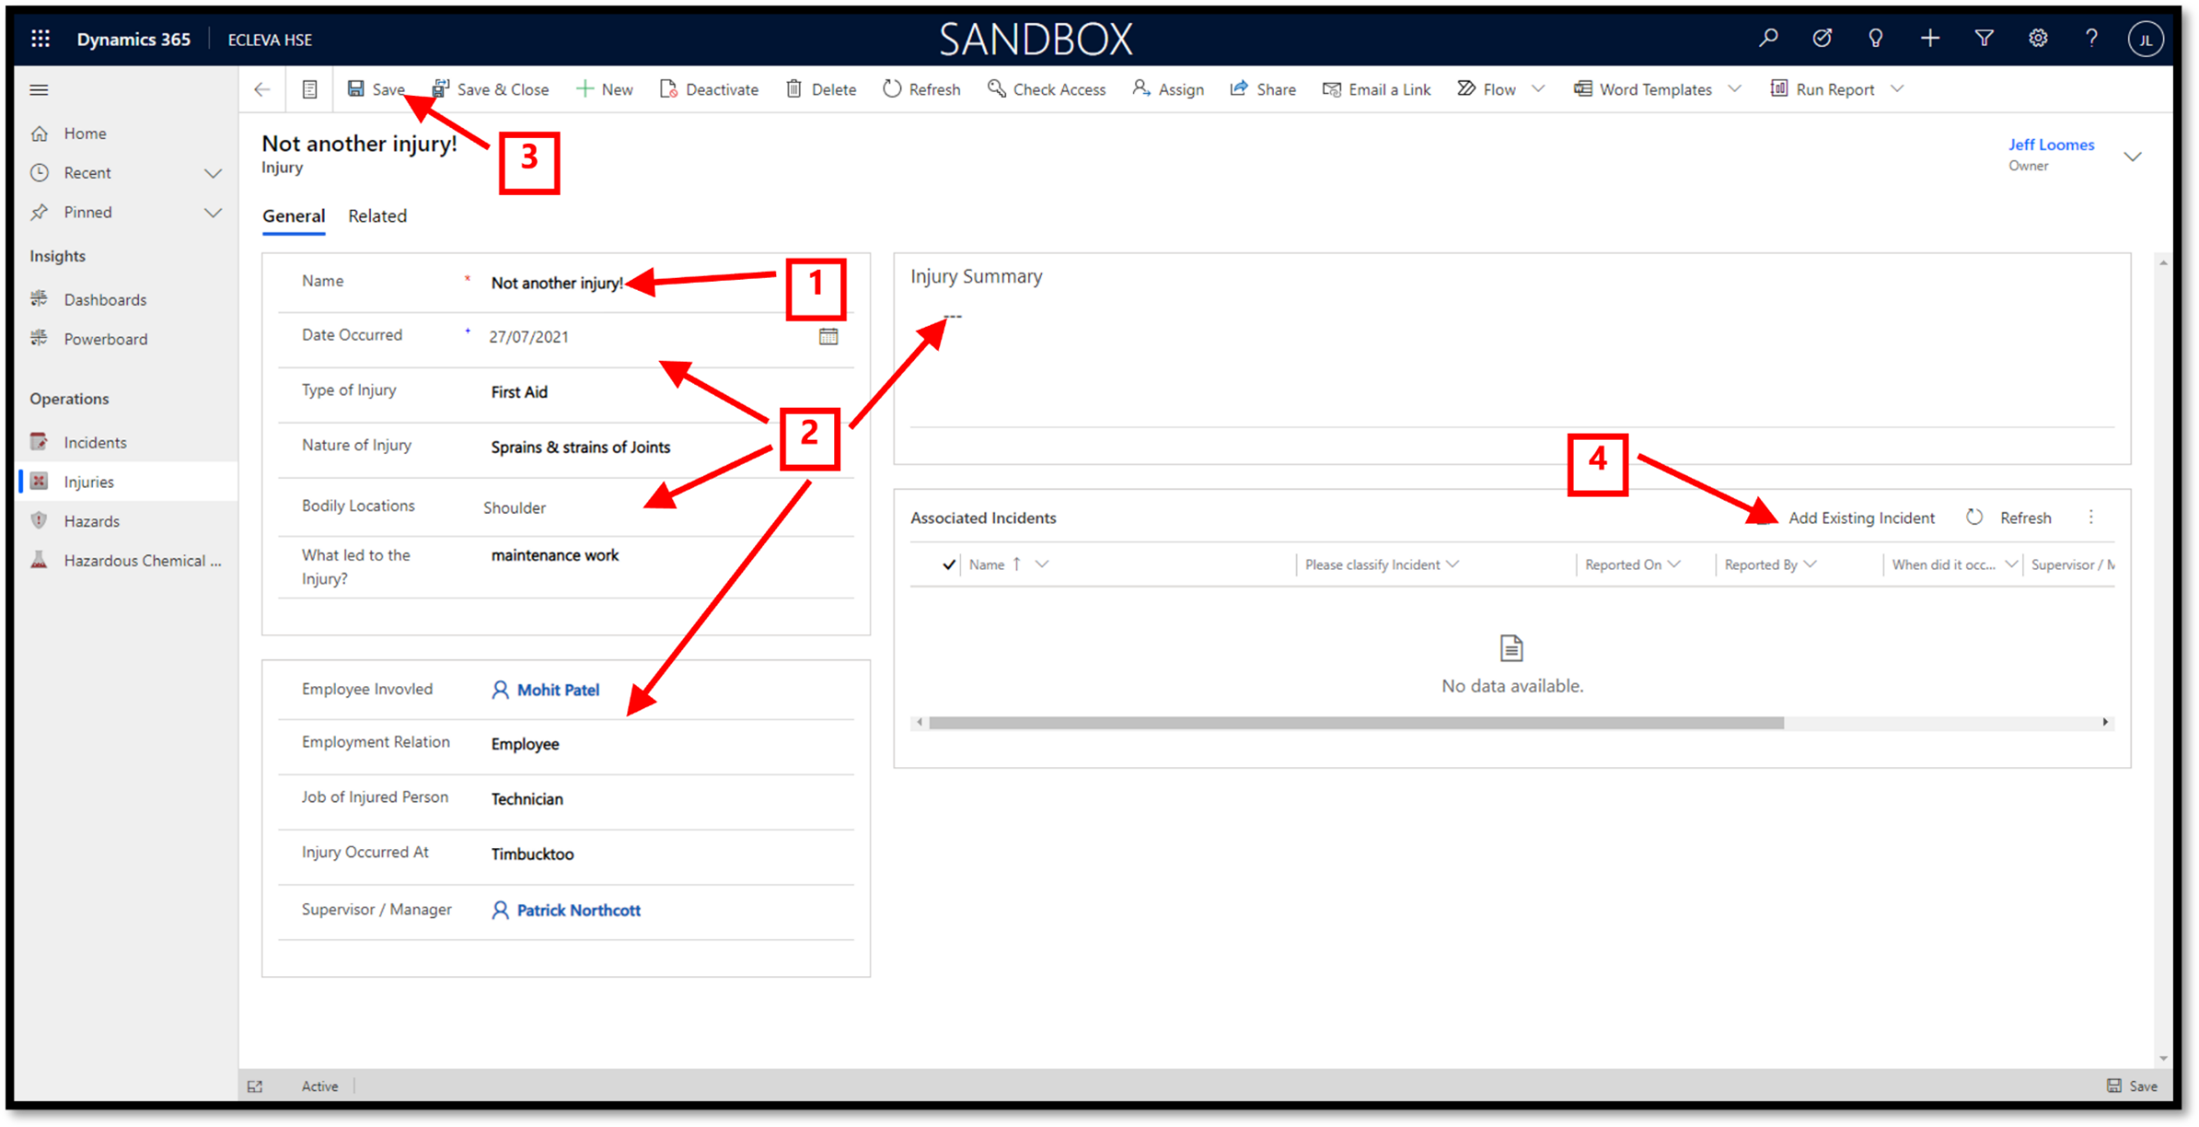
The General tab
You must enter information in all the mandatory fields (those marked with a red *), before you can save the record.
In the General tab: –
- Enter a Name that you wish to give this injury record.
This is a mandatory field and must contain data before saving the new record.
- Enter any other relevant information in other fields on this tab.
- Click on the Save button in the command bar to save the record.
- Click on the Add Existing Incident option in the Associated Incidents section, to associate one or more incidents with this injury record.
| Note
• Click on the Save or Save & Close button in the command bar when you have completed entering or updating information. |
 Hazards
The Hazard table type is where you are able to manage your hazard details by viewing, updating, deleting and creating new rows (records).
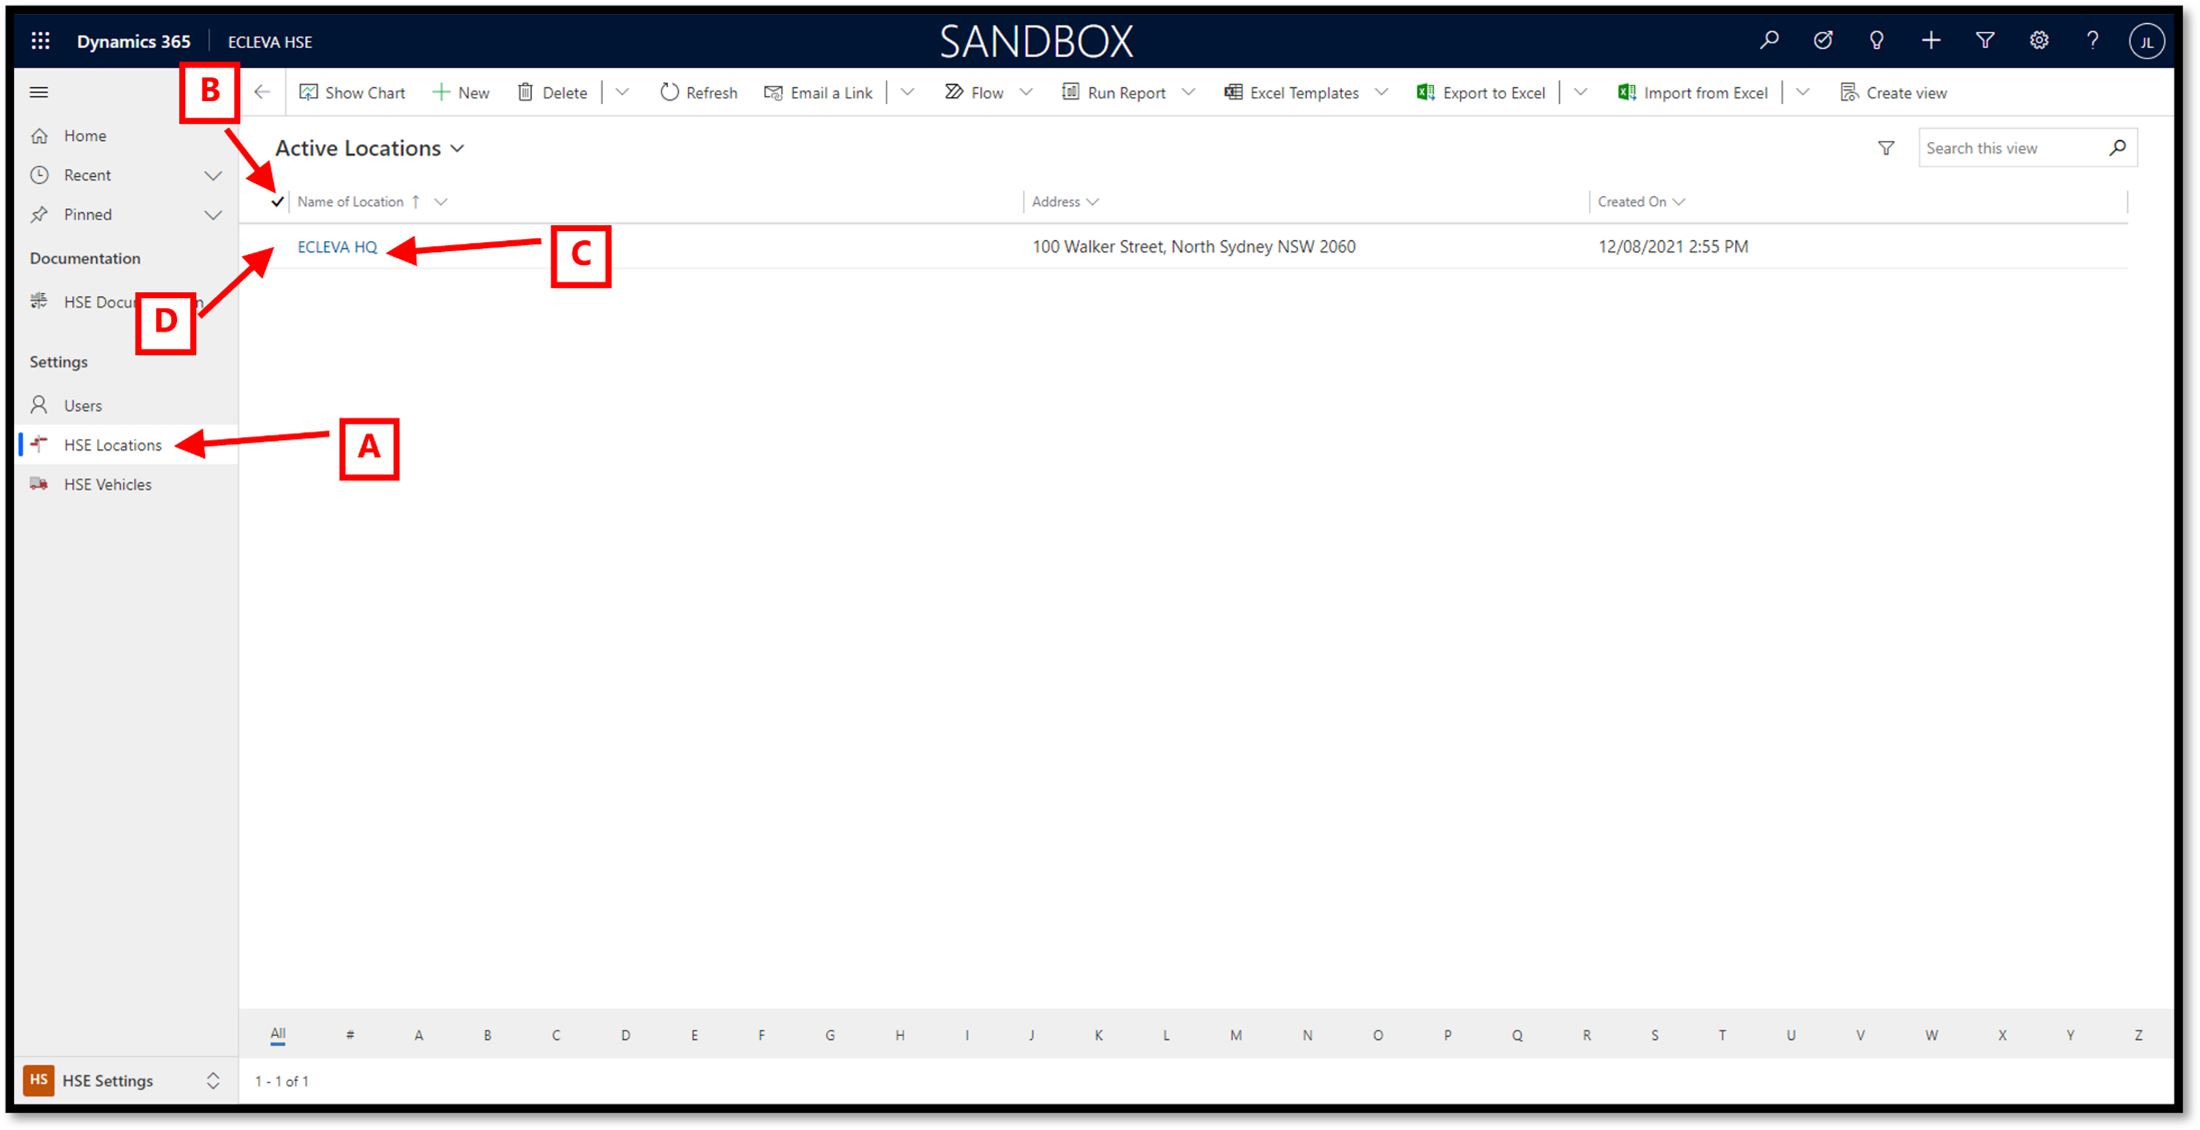
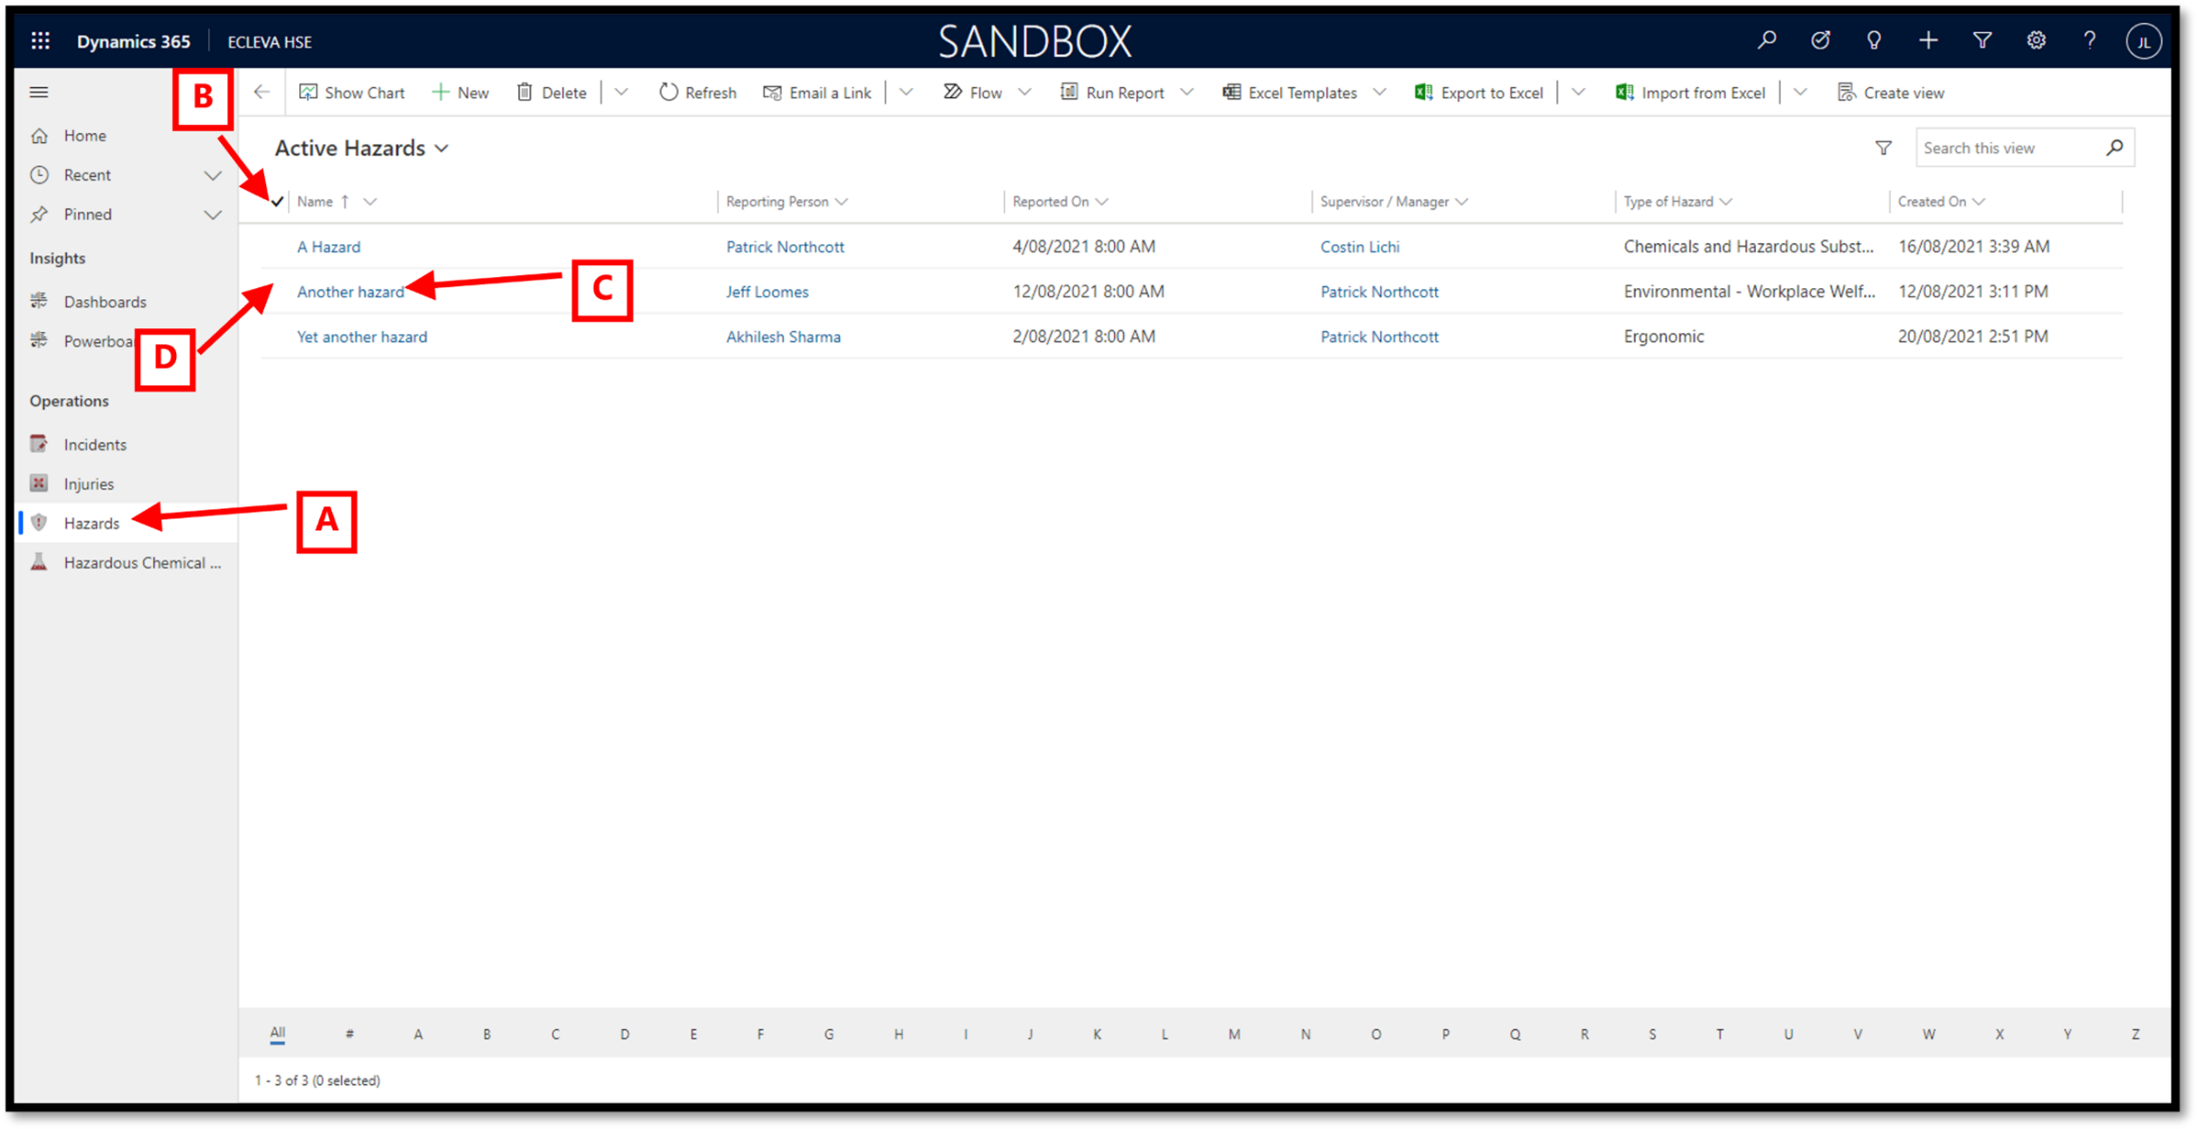
The Active Hazards view
The Active Hazards view displays all existing hazard records.
| Note
• You may have to use paging, backward or forward, to see all existing injury records. |
- Click on the Hazards option in the Sitemap to view existing rows.
- Click on the Tick icon to select all rows in the currently view.
Click on the Tick icon again to deselect all rows displayed.
- Click on the incident Name to directly open that record.
- Select a single row in the current view by: –
Clicking to the left of the name column, on any given row, to select that row.
or
Click in the white space on any given row, to select that row.
Select multiple rows by by holding down either the Shift or Ctrl button and selecting a row.
| Note
• Selecting one or more rows will change the available command bar buttons.
• Your assigned permissions also control the visible command bar buttons. |
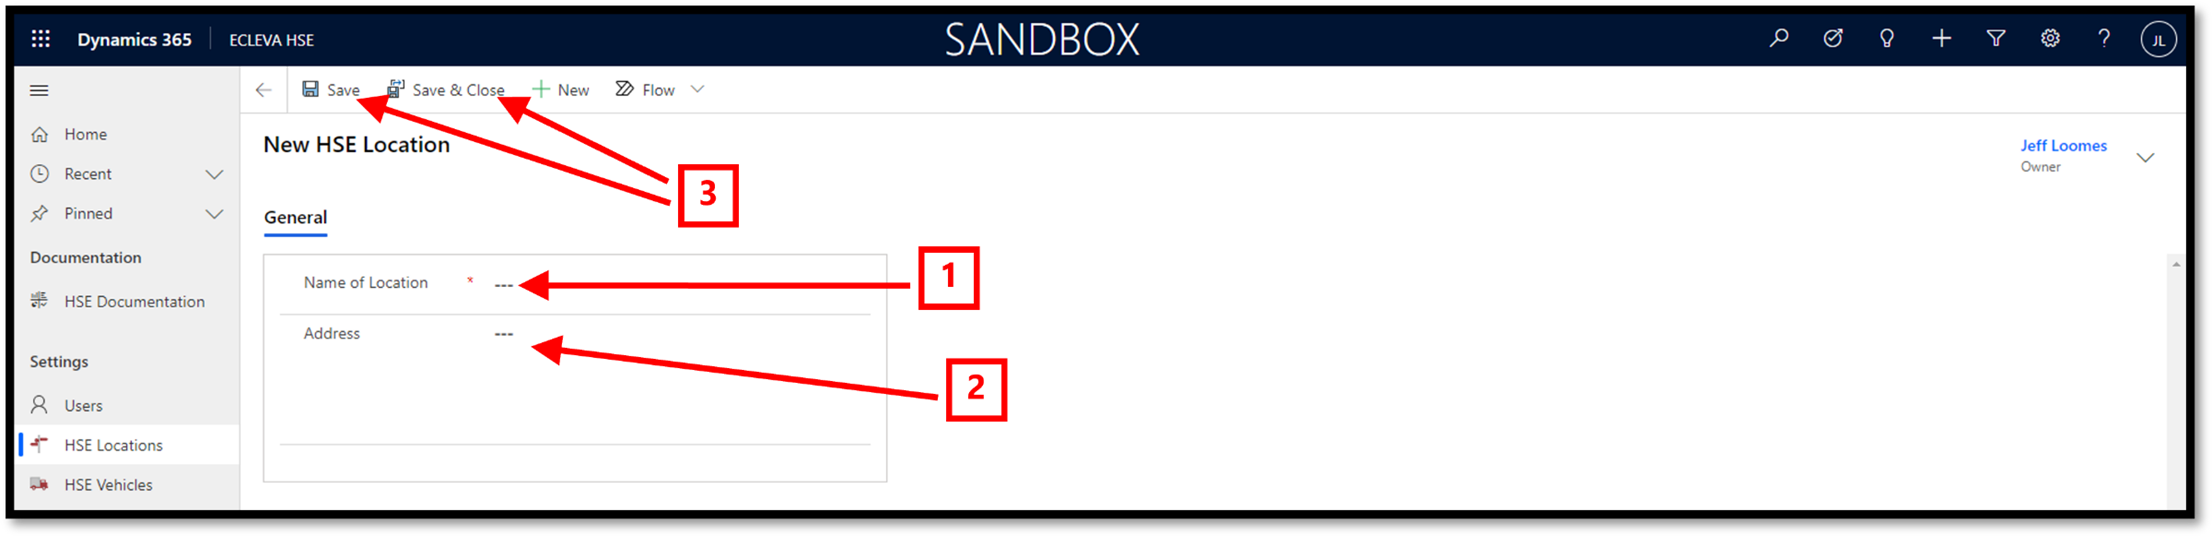
Creating a new Hazard record from a hazard view
- You can add new hazard records by clicking on the +New button in the command bar… this action will open a blank Hazard form.

Creating a new Hazard record from an open hazard record
- You can also add a new hazard record by clicking on the +New button in the command bar… this action will check the open hazard record for any unsaved changes, before opening a blank hazard form.

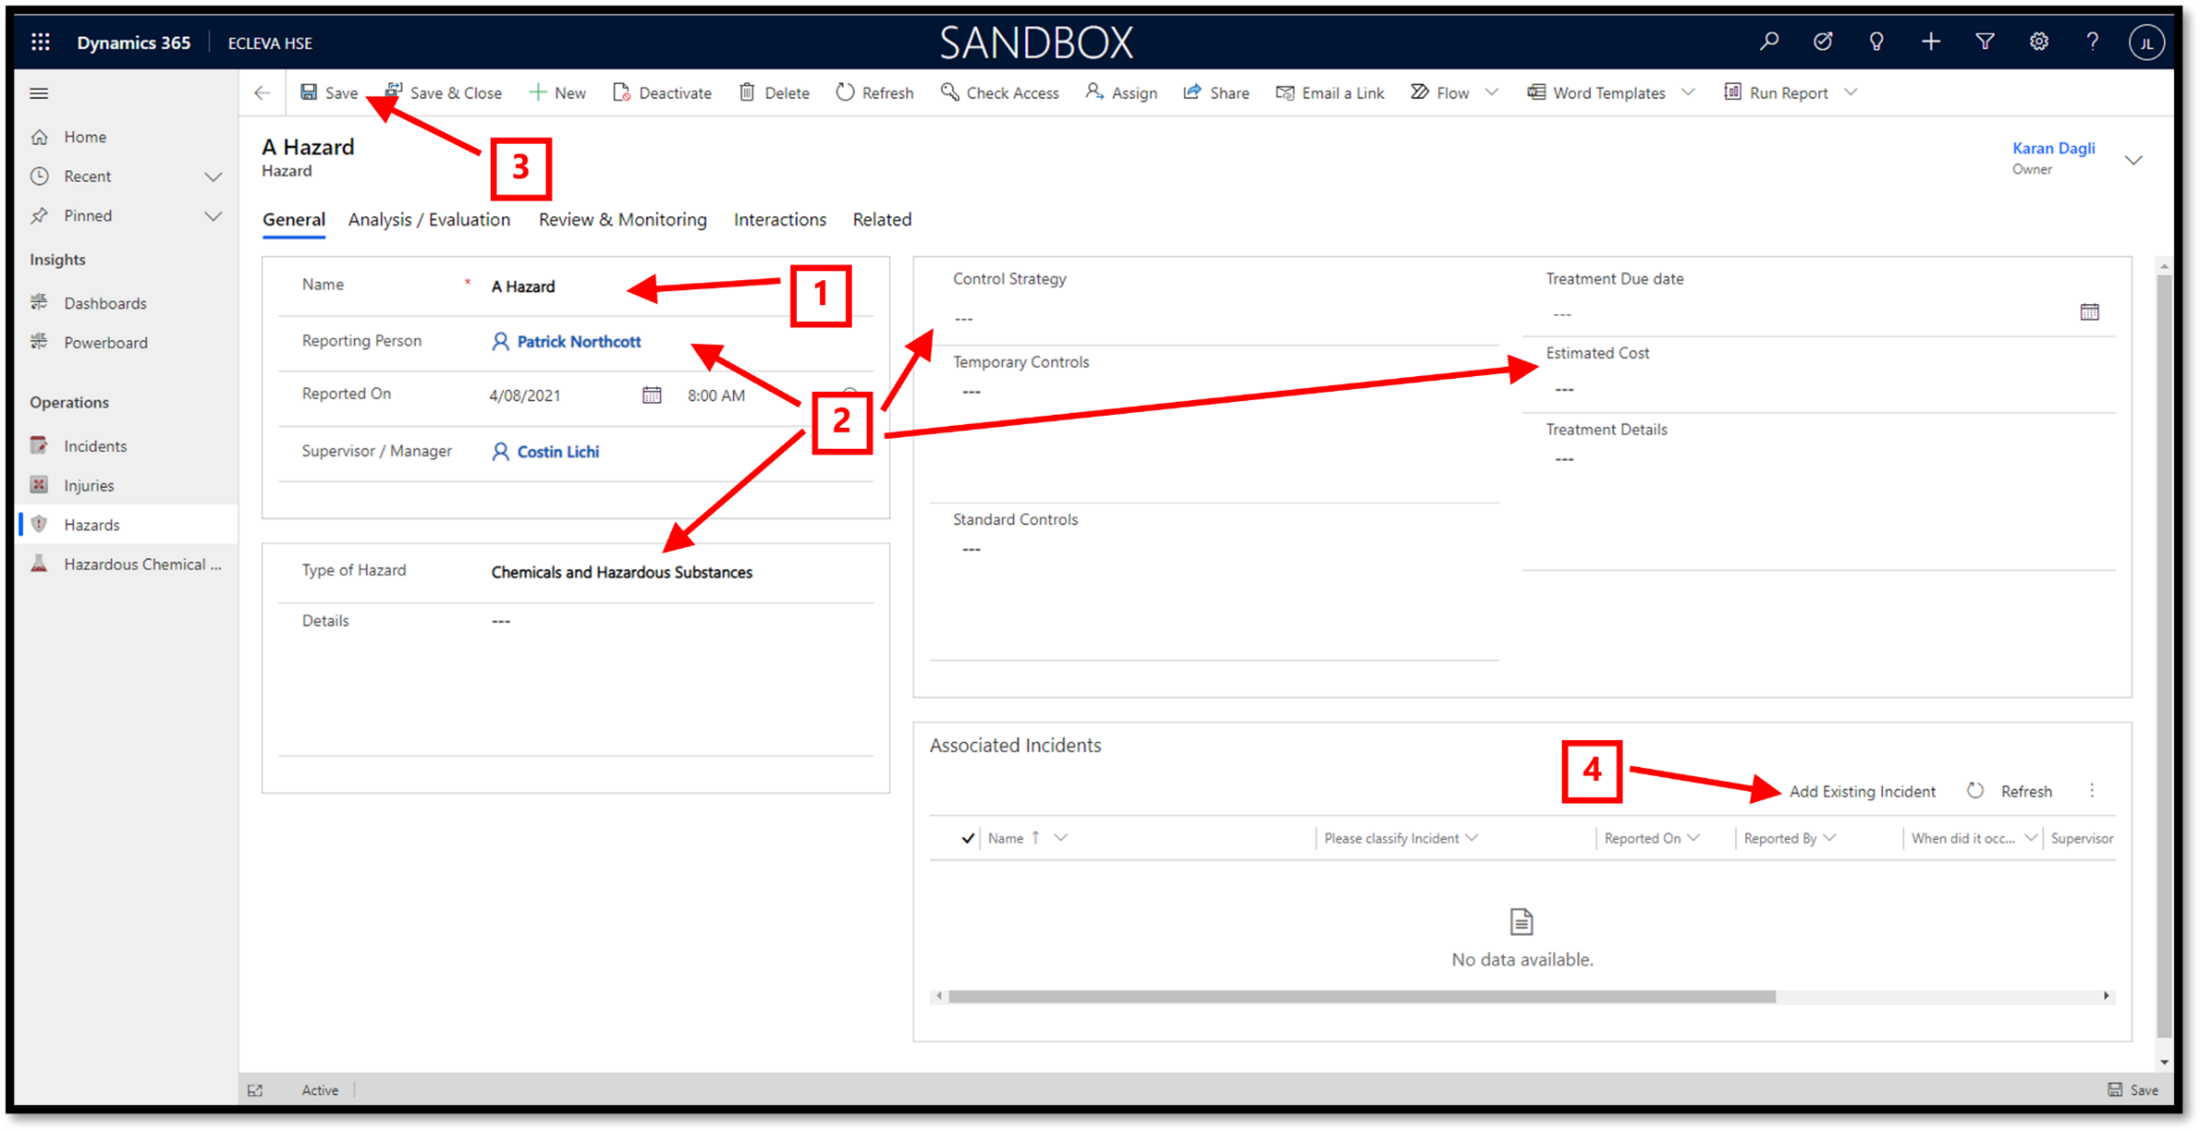
The General tab
You must enter information in all the mandatory fields (those marked with a red *), before you can save the record.
In the General tab: –
- Name – enter the name that you wish to give this hazard record.
This is a mandatory field and must contain data before saving the new record.
- Enter any other relevant information in other fields on this tab.
- Click on the Save button in the command bar to save the record.
- Click on the Add Existing Incident option in the Associated Incidents section, to associate one or more incidents with this hazard record.
| Note
• Click on the Save or Save & Close button in the command bar when you have completed entering or updating information. |
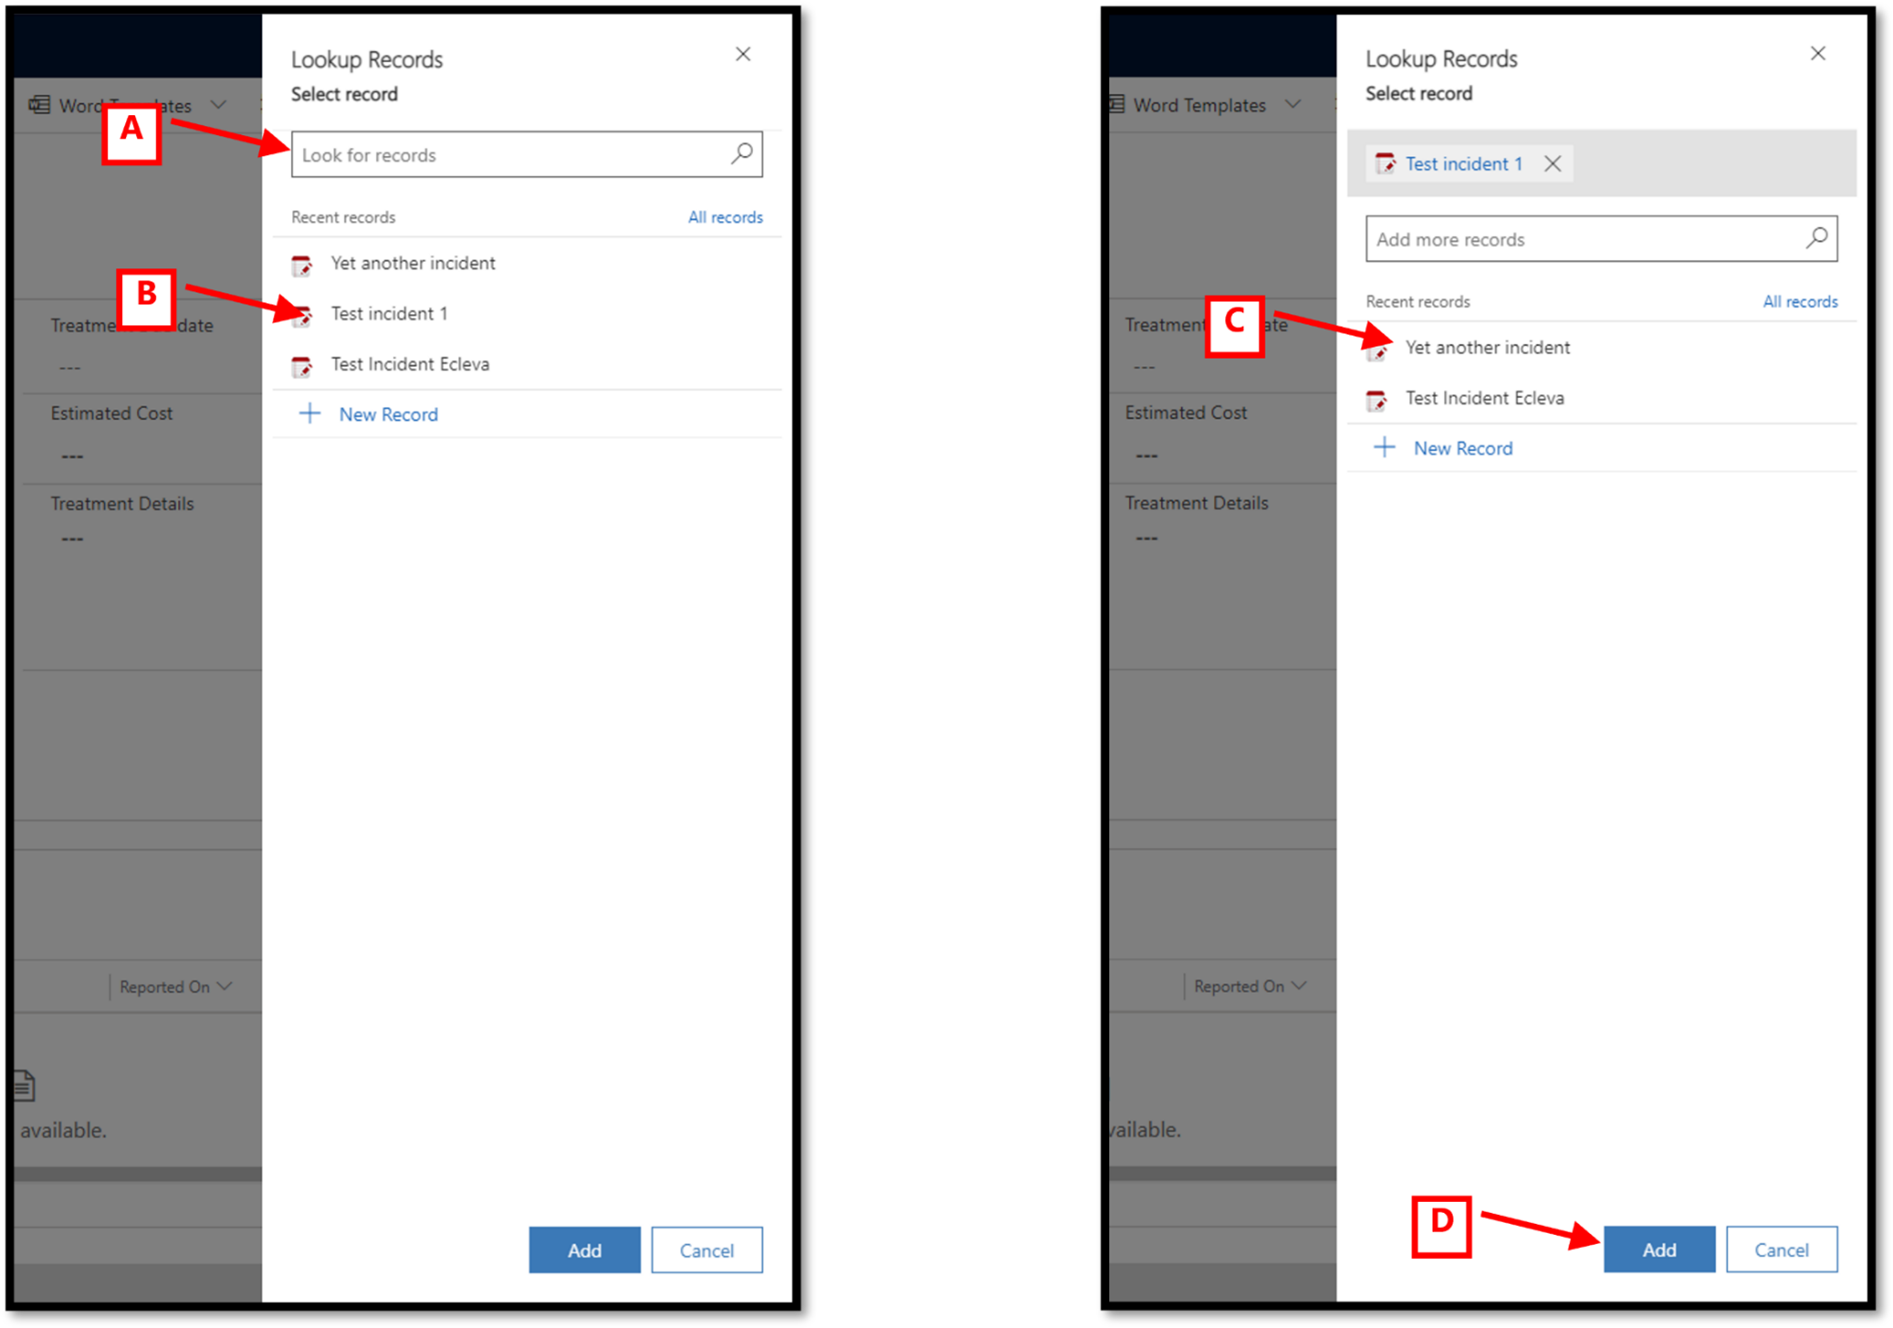
Adding an existing Incident to a Hazard
After clicking on the Add Existing Incident option, a Lookup Records form will slide in from the right side of your screen… you will need to find and select the incident record(s) by: –
- Entering your search string into the “Look for records” box.
- Clicking on a displayed record to select that record, or revise your search string if the required record is not displayed.
- Clicking on another displayed record to select that record, or enter a new search string into the “Add more records” box.
- Clicking on the Add button to associate the selected record(s) with this incident
| Note
• Add an * to the beginning of a search string to look for the string with the name of an injury. |
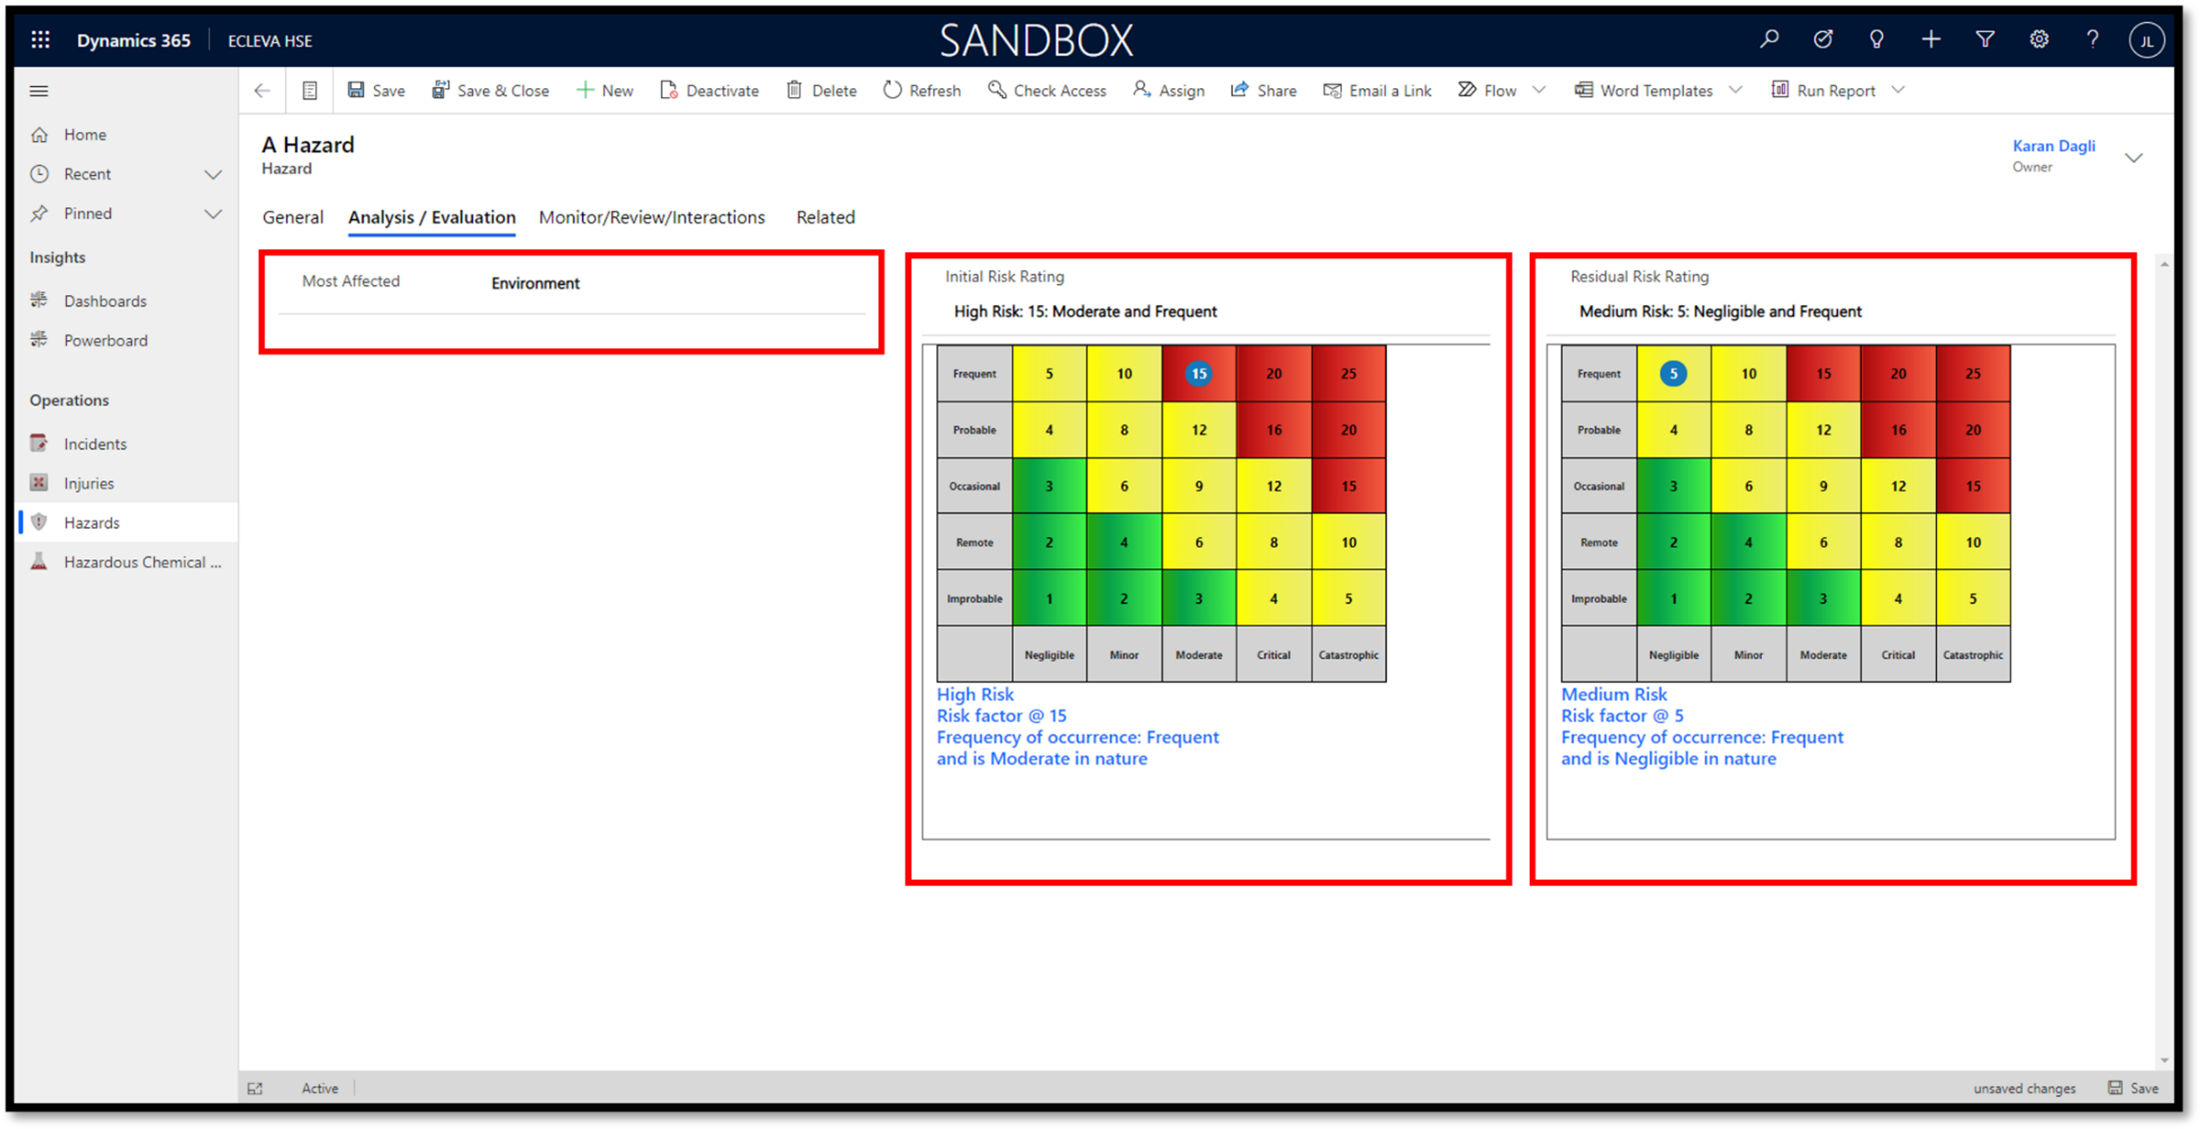
The Analysis / Evalution tab
In the Analysis / Evaluation tab: –
- Select the Most Affected option that best fits the hazard,
- Select the Initial Risk Rating by clicking on a coloured square in the risk matrix… this action will auto fill the text associated with the selected risk matrix number, and
- Select the Residual Risk Rating by clicking on a coloured square in the risk matrix… this action will auto fill the text associated with the selected risk matrix number.
| Note
• Click on the Save or Save & Close button in the command bar when you have completed entering or updating information. |
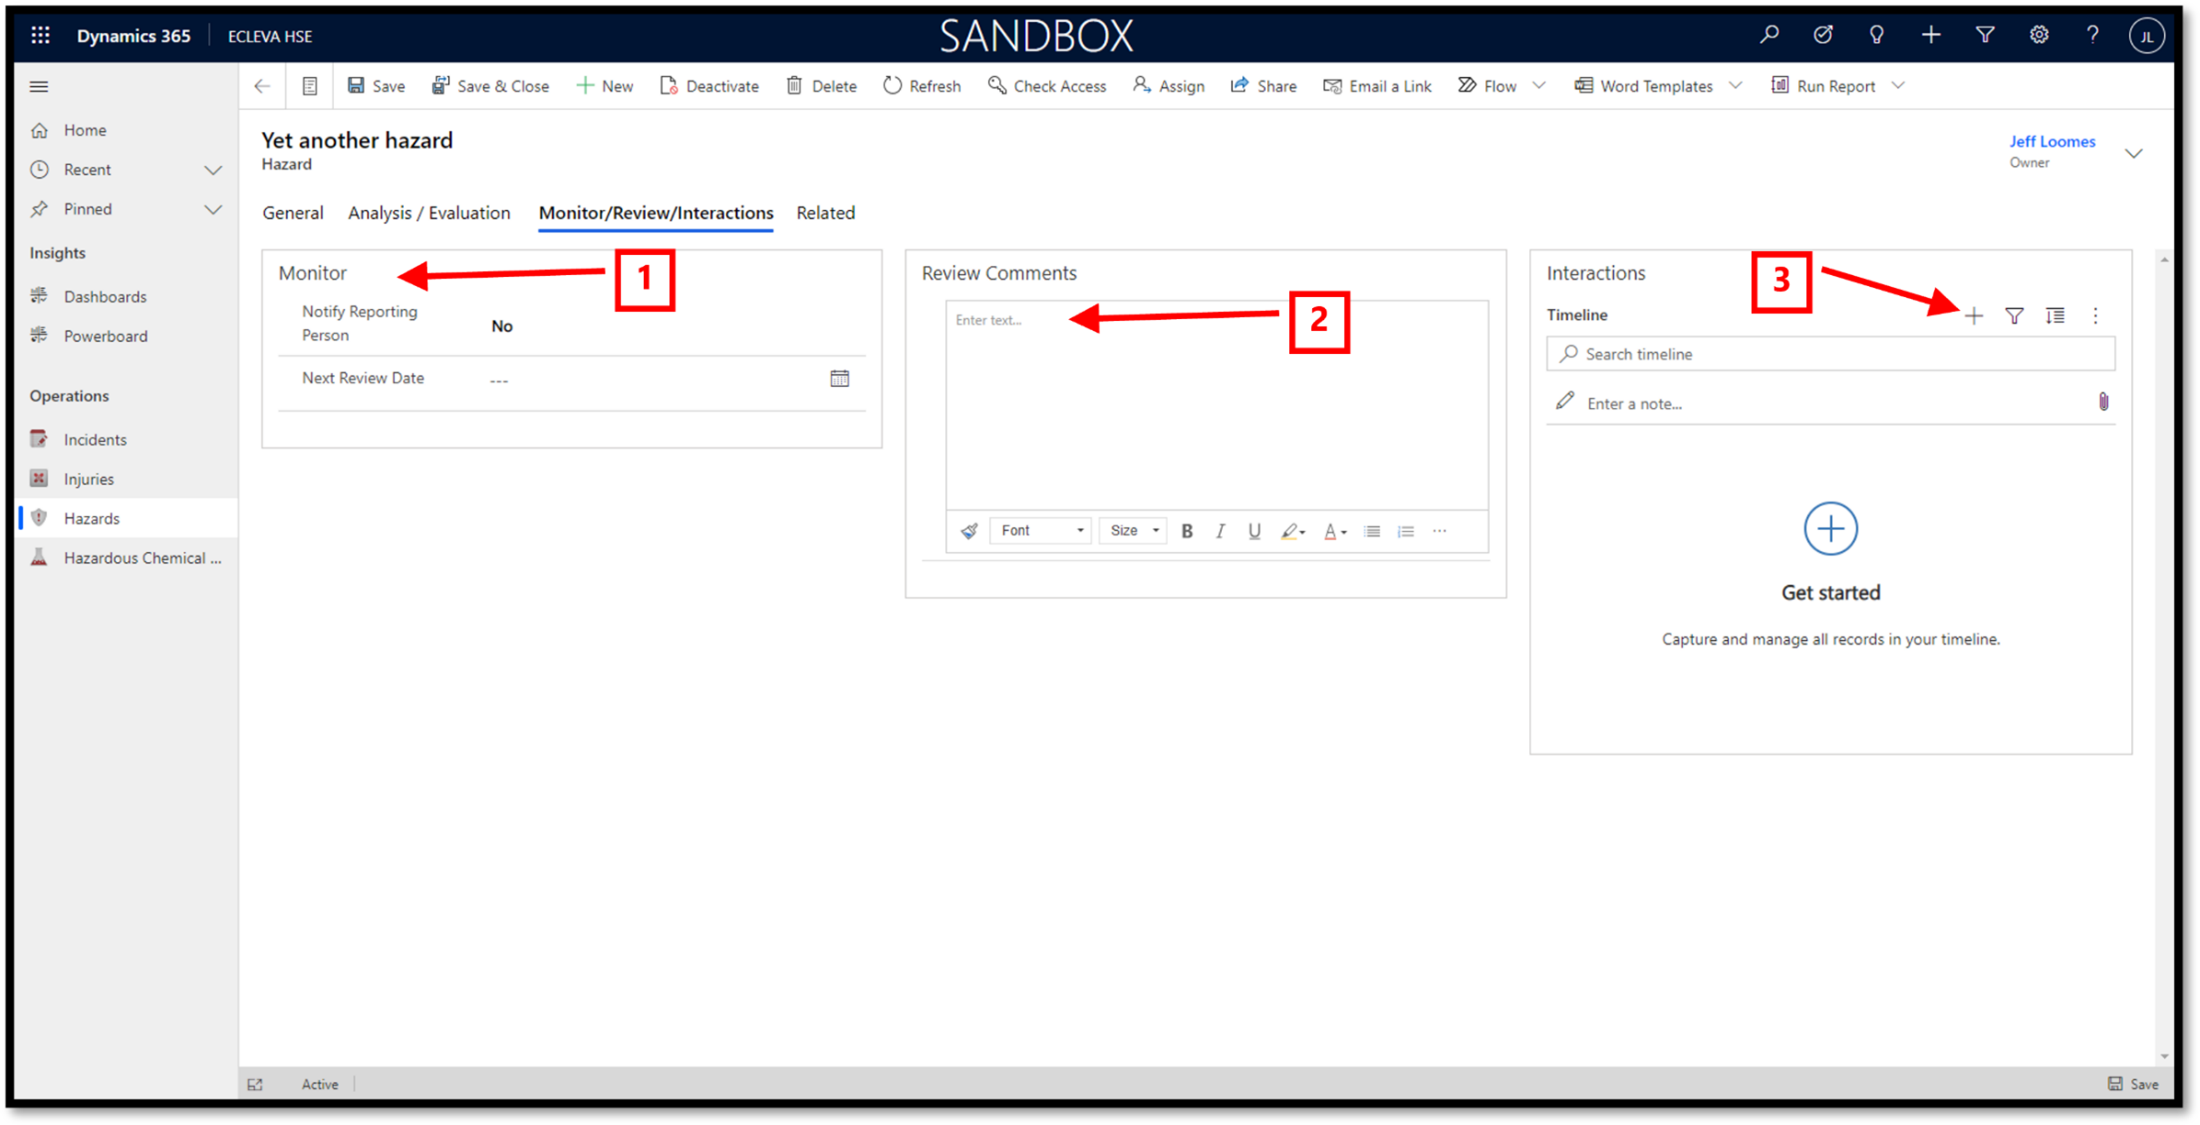
The Monitor/Review/Interactions tab
In the Monitor/Review/Interactions tab, you can: –
- Add relevant information in the Monitor
- Add any commnts in the Review Comments
- Add one or more new Notes or Activities by clicking on the + icon in the Interactions
| Note
• You can only add new Notes or Activities, once the hazard has been saved.
• Click on the Save or Save & Close button in the command bar when you have completed entering or updating information. |
Hazardous Chemical Register
The Hazardous Chemical table type is where you are able to manage your register of hazardous chemical details by viewing, updating, deleting and creating new rows (records).
The Active Hazardous Chemical Register view
The Active Hazards view displays all existing hazard records.
| Note
• You may have to use paging, backward or forward, to see all existing injury records. |
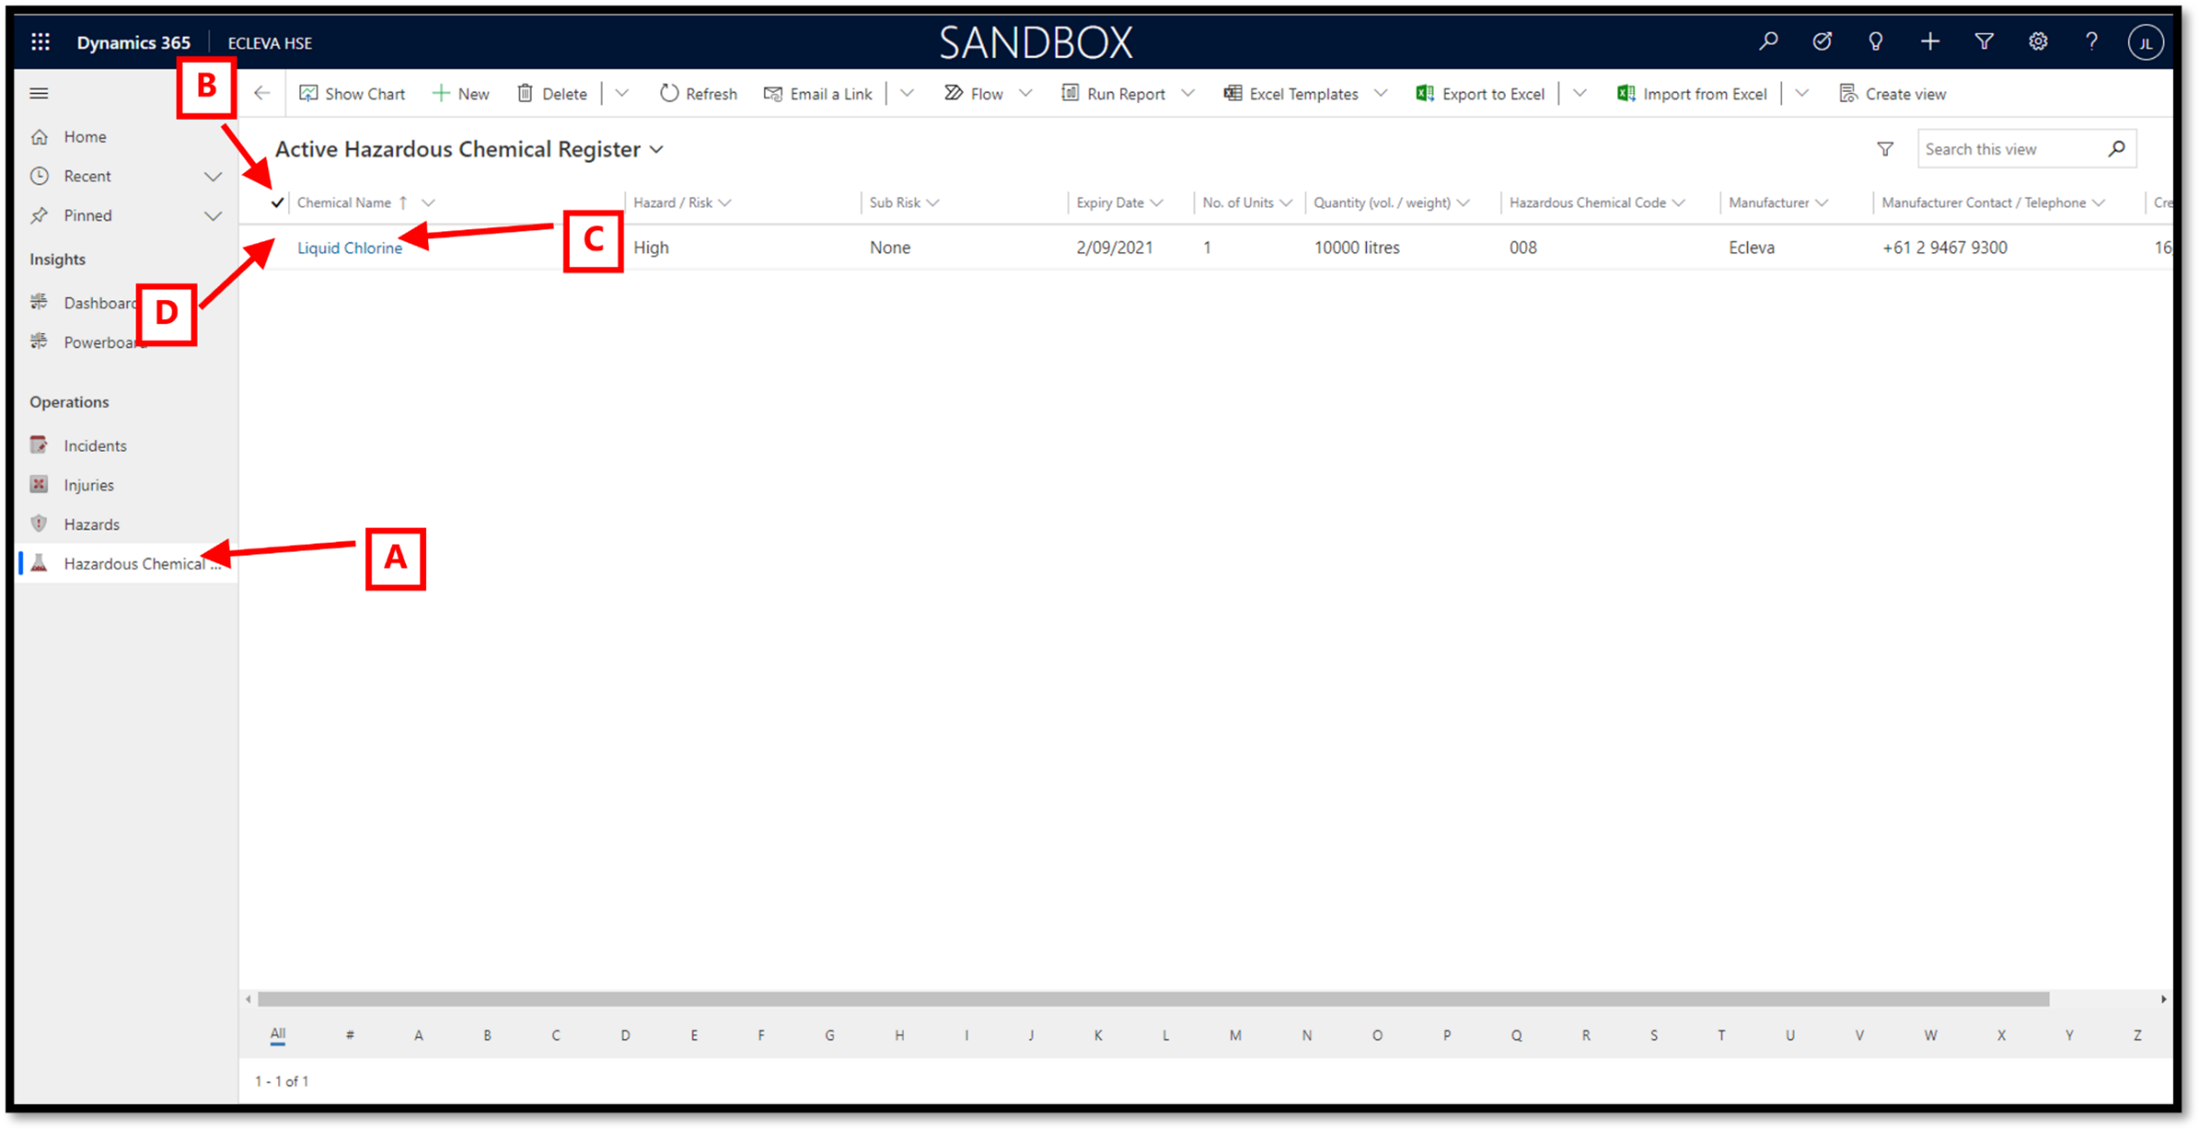
- Click on the Hazardous Chemicals option in the Sitemap to view existing rows.
- Click on the Tick icon to select all rows in the currently view.
Click on the Tick icon again to deselect all rows displayed.
- Click on the incident Name to directly open that record.
- Select a single row in the current view by: –
Clicking to the left of the name column, on any given row, to select that row.
or
Click in the white space on any given row, to select that row.
Select multiple rows by by holding down either the Shift or Ctrl button and selecting a row.
| Note
• Selecting one or more rows will change the available command bar buttons.
• Your assigned permissions also control the visible command bar buttons. |
Creating a new Hazardous Chemical Register record from a hazardous chemical register view
- You can add new hazardous chemical register records by clicking on the +New button in the command bar… this action will open a blank Hazardous Chemical form.

Creating a new Hazardous Chemical Register record from an open hazardous chemical register record
- You can also add a new hazardous chemical register record by clicking on the +New button in the command bar… this action will check the open hazard chemical register record for any unsaved changes, before opening a blank hazardous chemical register form.

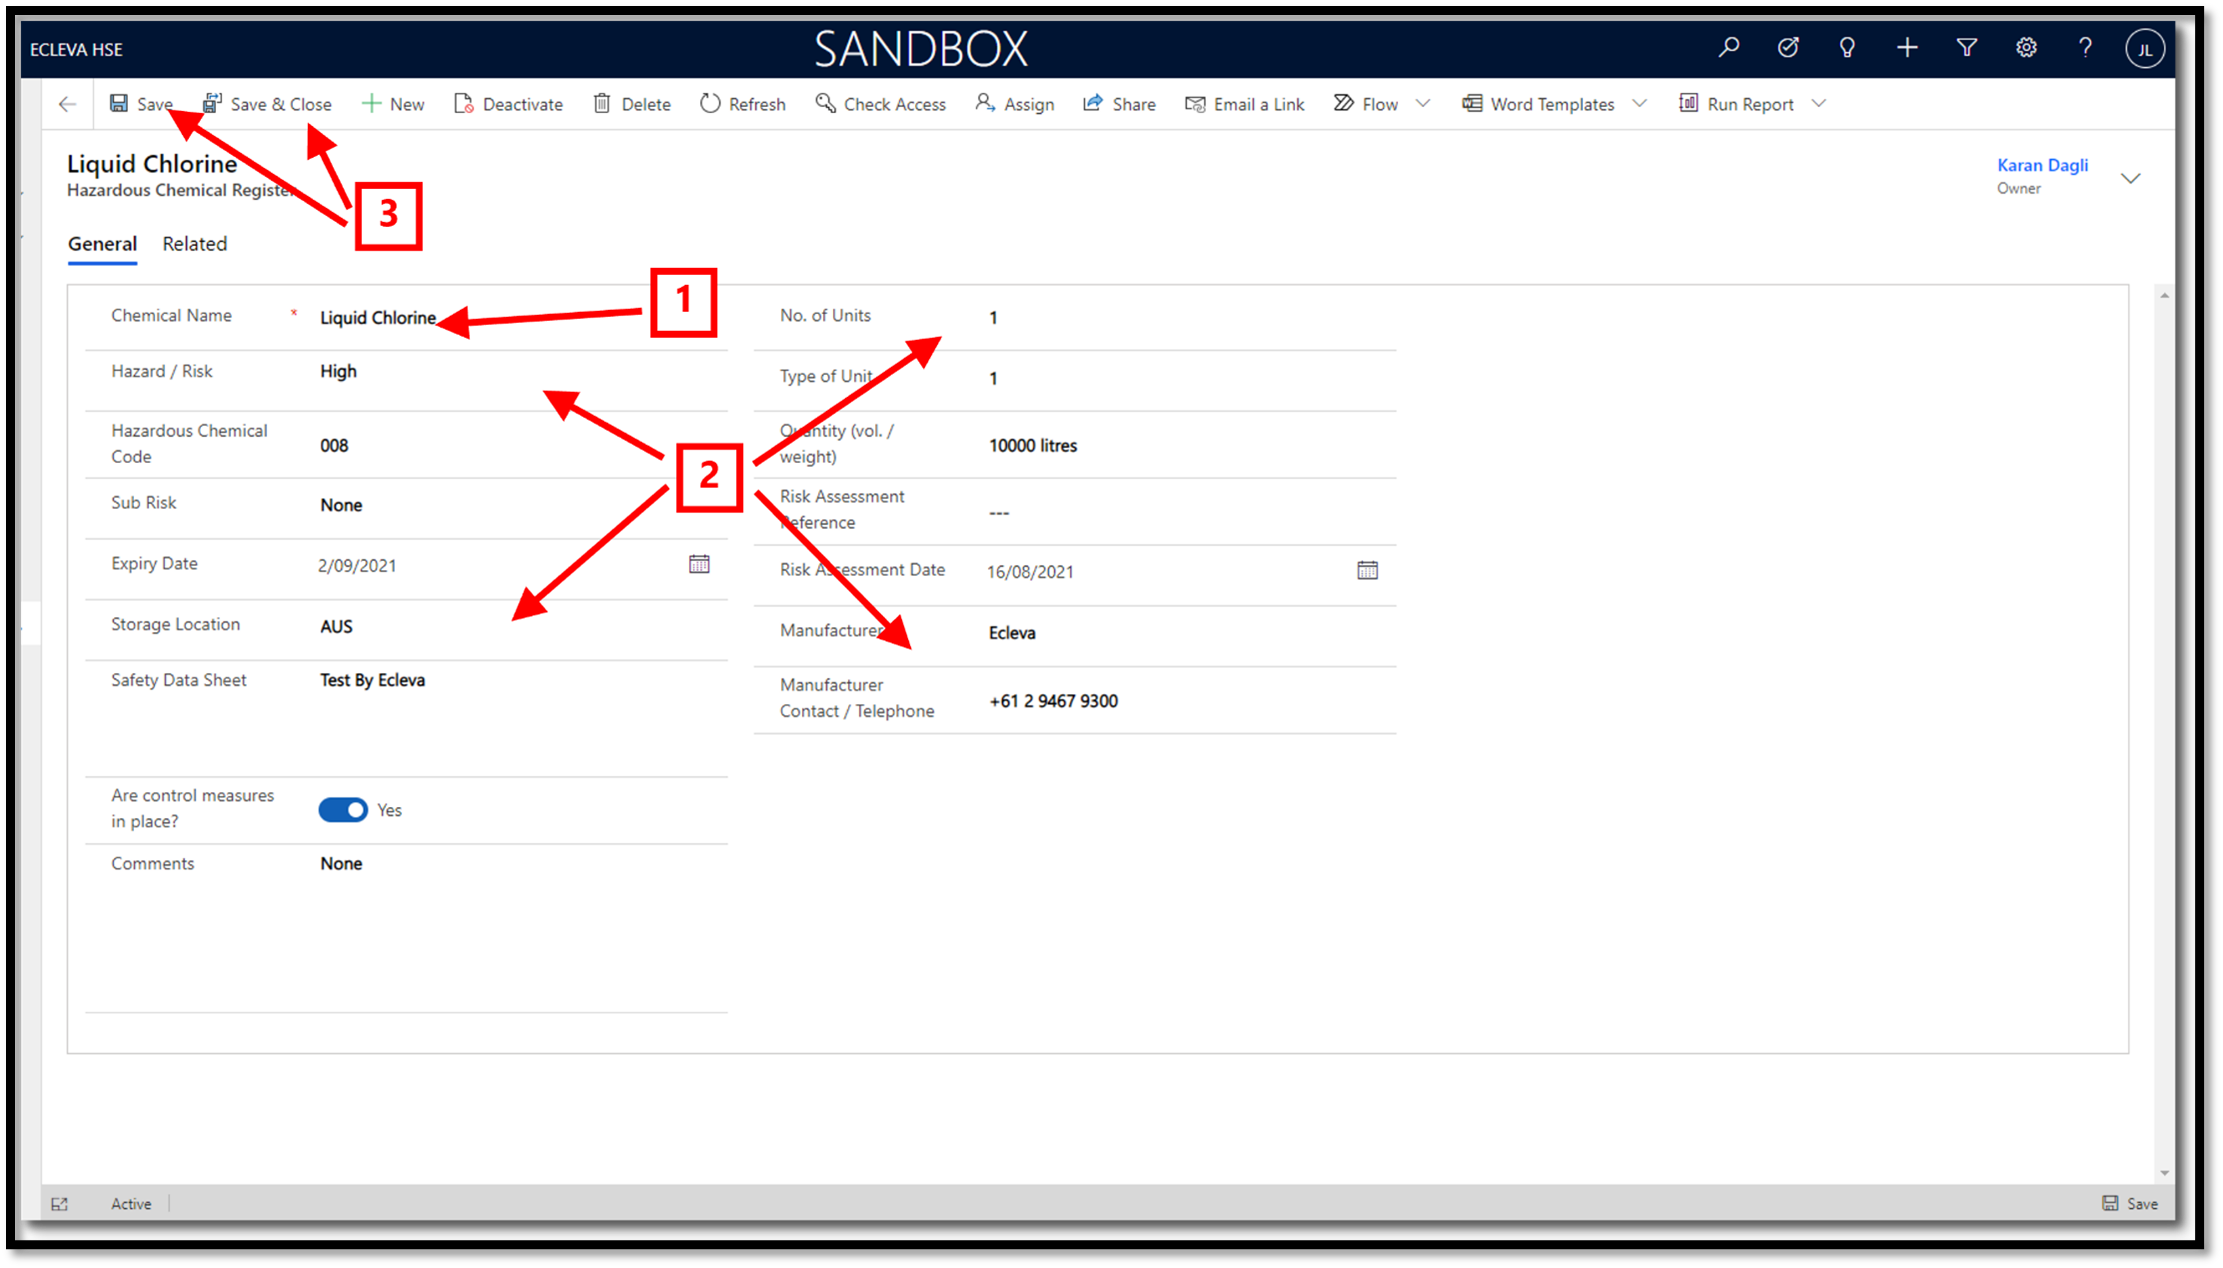
The General tab
You must enter information in all the mandatory fields (those marked with a red *), before you can save the record.
In the General tab: –
- Chemical Name – enter the chemical name for this record.
This is a mandatory field and must contain data before saving the new record.
- Enter any other relevant information in other fields on this tab.
- Click on the Save or Save & Close button in the command bar to save the record.
| Note
• Click on the Save or Save & Close button in the command bar when you have completed entering or updating information. |